
It was a crisp autumn afternoon, the kind where the air has a distinct crispness that just makes you want to snuggle up with a warm, comforting treat. That’s exactly what I had in mind when I decided to try my hand at making Bloomin’ Apples. I’d seen these beauties all over social media, and the thought of a sweet, caramelized apple stuffed with a buttery, cinnamon-y filling had my mouth watering.
As I gathered my ingredients, I couldn’t help but feel a sense of nostalgia. You see, my grandma used to make the most incredible Bloomin’ Apples when I was a kid. I can still picture her in the kitchen, carefully coring the apples and filling them with that irresistible mixture. The aroma that would waft through the house was enough to make anyone’s stomach rumble. And when those apples came out of the oven, all golden and bubbly, it was pure magic.
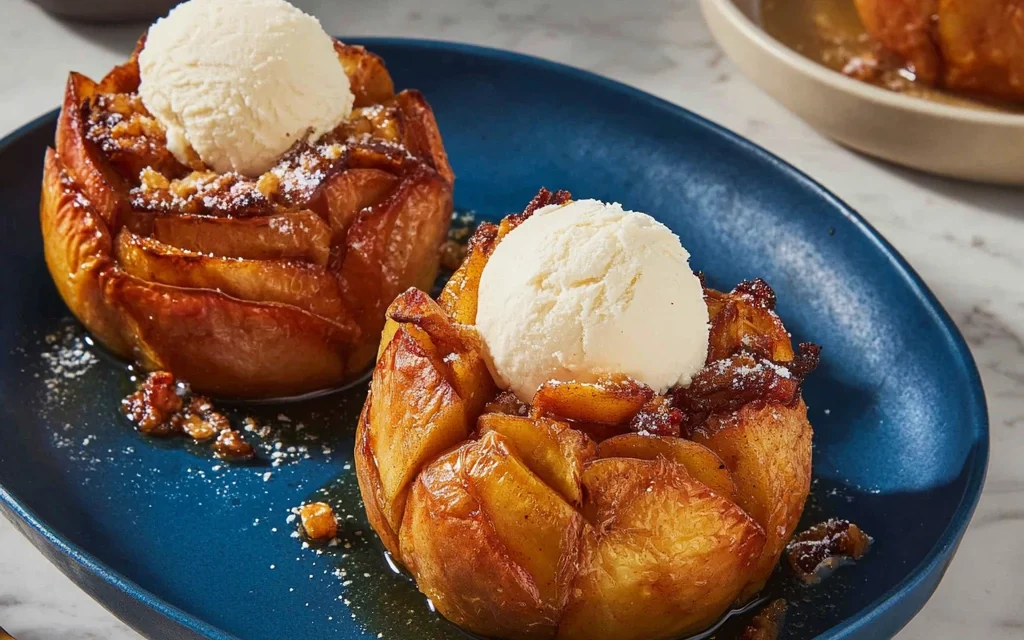
So, as I began preheating my oven and slicing into those crisp Honeycrisps, I knew I was in for a real treat. And let me tell you, these Bloomin’ Apples did not disappoint. They were everything I remembered and more – the perfect balance of tart and sweet, with a texture that was simply out of this world. I couldn’t wait to share them with my family and friends, because I just knew they’d fall in love with Bloomin’ Apples just like I had.
Why This Bloomin’ Apples Recipe Will Become Your Go-To
The Secret Behind Perfect Bloomin’ Apples
What sets this Bloomin’ Apples recipe apart is the attention to detail in both the preparation and the cooking process. By carefully coring the apples and creating the perfect filling, you end up with a dessert that’s not only visually stunning but also bursting with flavor in every bite. And the key to getting that irresistible caramelized topping? A quick broil at the end that takes these Bloomin’ Apples to the next level.
Essential Ingredients You’ll Need
- Honeycrisp apples: These apples hold their shape well during baking, and their sweet-tart flavor is the perfect complement to the filling.
- Brown sugar: This adds a rich, caramelized sweetness to the filling.
- Cinnamon: The classic spice that just screams “fall” and perfectly enhances the apple flavor.
- Butter: For a luscious, decadent filling that ties everything together.
- Pecans: These add a lovely crunch and nutty flavor to the Bloomin’ Apples.
- Vanilla extract: Just a touch to round out the flavors.
Step-by-Step Bloomin’ Apples Instructions
Preparing Your Bloomin’ Apples
Making Bloomin’ Apples is easier than you might think! With just a few simple steps, you can have this showstopping dessert ready to enjoy. The total prep and cook time is about an hour, and you’ll need a sharp knife, a coring tool, and a baking sheet.
1- Start by preheating your oven to 375°F. Wash and core the Honeycrisp apples, making sure to leave the bottom intact so the filling doesn’t spill out.
2- In a small bowl, mix together the brown sugar, cinnamon, butter, pecans, and vanilla extract until well combined. Spoon this irresistible filling into the cored apples, packing it in tightly.
3- Place the stuffed apples on a baking sheet and bake for 30-35 minutes, until the apples are tender and the filling is bubbly.
4- Once the Bloomin’ Apples come out of the oven, keep a close eye on them. You’ll want to broil them for 2-3 minutes to get that caramelized, golden-brown topping.
5- Be careful when removing the apples from the oven, as the filling will be very hot. Use a spoon to drizzle any excess filling over the tops of the apples.
6- Let the Bloomin’ Apples cool for 5-10 minutes before serving, then dig in and enjoy!
Pro Tips for Success
To ensure your Bloomin’ Apples turn out perfectly every time, here are a few pro tips:
- Make sure to use Honeycrisp apples, as they hold their shape beautifully during baking.
- Be gentle when coring the apples to avoid accidentally piercing through the bottom.
- Don’t be afraid to really pack in that delectable filling – the more, the better!
- Keep a close eye on the apples while broiling to prevent them from burning.
- Allow the Bloomin’ Apples to cool slightly before serving, as the filling will be very hot.
Serving and Storing Your Bloomin’ Apples
Perfect Pairings for Bloomin’ Apples
These Bloomin’ Apples are the ultimate fall dessert, and they pair beautifully with a scoop of vanilla ice cream or a dollop of whipped cream. For a cozy autumn evening, serve them alongside a warm mug of apple cider or a glass of red wine. And if you’re feeling extra indulgent, a drizzle of caramel sauce or a sprinkle of chopped pecans on top takes them to the next level.
Storage and Make-Ahead Tips
Leftover Bloomin’ Apples can be stored in an airtight container in the refrigerator for up to 3 days. To reheat, simply place them in a 350°F oven for 10-15 minutes until warmed through. You can also make the filling ahead of time and store it in the fridge until you’re ready to assemble and bake the apples.
Variations and Dietary Adaptations for Bloomin’ Apples
Creative Bloomin’ Apples Variations
While this classic Bloomin’ Apples recipe is simply divine, there are plenty of ways to put your own spin on it. Try using a different type of apple, like Gala or Fuji. Swap out the pecans for walnuts or almonds. Or mix in some dried cranberries or raisins for a pop of tartness. You can even experiment with different spices, like nutmeg or allspice, to create your own signature Bloomin’ Apples.
Making Bloomin’ Apples Diet-Friendly
For a healthier version of Bloomin’ Apples, you can use a sugar substitute in the filling and opt for a dairy-free butter alternative. To make them gluten-free, simply use gluten-free flour or oats in the filling. And for a vegan twist, swap the butter for coconut oil or a plant-based butter and skip the pecans.
Frequently Asked Questions
Q: Can I use a different type of apple besides Honeycrisp?
A: While Honeycrisps are our top recommendation, you can absolutely use other firm, tart-sweet apples like Gala, Fuji, or Pink Lady. Just be sure to adjust the baking time as needed, as some varieties may soften more quickly than others.
Q: How do I prevent the apples from leaking while baking?
A: The key is to be very careful when coring the apples, making sure not to pierce through the bottom. Additionally, packing the filling in tightly can help keep everything contained. If you do see any leakage, simply spoon the excess filling back over the tops of the apples.
Q: Can I make Bloomin’ Apples ahead of time?
A: Absolutely! The filling can be made up to 3 days in advance and stored in the refrigerator. When you’re ready to bake, simply stuff the apples and pop them in the oven. You can also bake the Bloomin’ Apples ahead of time and reheat them in a 350°F oven for 10-15 minutes before serving.
Q: How many Bloomin’ Apples does this recipe make?
A: This recipe will yield 6 individual Bloomin’ Apples. If you’re serving a larger crowd, you can easily double or triple the recipe as needed.
Q: What should I do if the apples aren’t softening during baking?
A: If the apples aren’t tender after 30-35 minutes, simply increase the baking time in 5-minute increments until they reach your desired doneness. Some varieties may take a bit longer to soften up. Just be sure to keep an eye on them to prevent burning.

Bloomin’ Apples
- Total Time: 40
- Yield: 6
Description
Indulge in the delightful flavors of autumn with these Bloomin’ Apples. Baked to perfection, these sweet and tender apples are filled with a caramel-like filling that’s sure to delight your taste buds.
Ingredients
– 6 Granny Smith apples
– 1/2 cup brown sugar
– 1 teaspoon ground cinnamon
– 1/4 cup unsalted butter, softened
– 1/4 cup chopped walnuts (optional)
Instructions
1. – Preheat oven to 375°F (190°C).
2. – Core the apples, leaving the bottom intact, and create a well in the center of each apple.
3. – In a small bowl, mix together the brown sugar and cinnamon.
4. – Spoon the brown sugar mixture into the center of each apple, packing it down gently.
5. – Top each apple with a small pat of butter.
6. – Place the stuffed apples in a baking dish and bake for 30-35 minutes, or until the apples are tender and the filling is bubbly.
7. – Remove from the oven and let cool for 5 minutes.
8. – Serve warm, optionally topped with a scoop of vanilla ice cream and a drizzle of caramel sauce.
Notes
For a crunchier topping, sprinkle the chopped walnuts over the apples before baking. Adjust baking time as needed, depending on the size of your apples.
- Prep Time: 10
- Cook Time: 30
- Category: Dessert
- Method: Baking
- Cuisine: American
Conclusion
Get ready to fall head over heels for these incredible Bloomin’ Apples! With their perfect balance of sweet and tart, and that irresistible caramelized topping, this recipe is truly a showstopper. Whether you’re serving them for a cozy fall gathering or just treating yourself, I promise these Bloomin’ Apples will become a new family favorite. So grab some Honeycrisps and get baking – your taste buds (and your guests) will thank you!


