
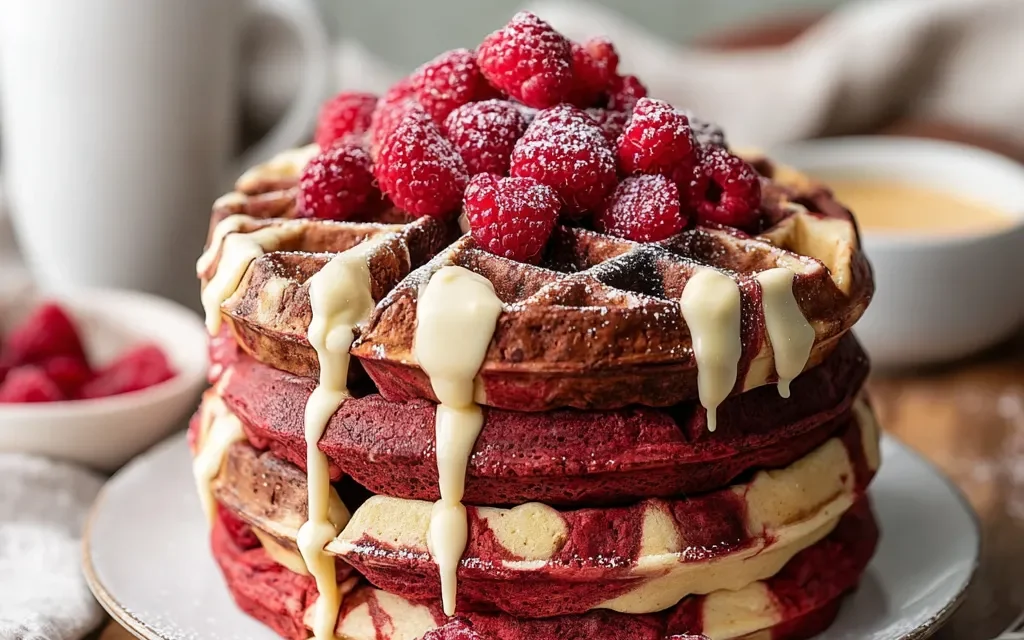
There’s nothing quite like the aroma of freshly baked Red Velvet Marble Waffles wafting through the kitchen on a lazy weekend morning. It instantly transports me back to my grandma’s cozy kitchen, where she would whip up these decadent treats for our family gatherings. The rich, chocolatey scent mingling with the sweetness of the red velvet batter was enough to get my mouth watering, and I’d eagerly await my turn to dig in, savoring every bite.
As an adult, I’ve tried countless waffle recipes, but none have quite captured the magic of those childhood memories like this Red Velvet Marble Waffles recipe. It’s become a staple in my household, a dish that always brings a smile to my family’s faces and a sense of nostalgic comfort. Whether we’re hosting a brunch for friends or just treating ourselves on a lazy Sunday, these waffles never fail to impress.
Why This Red Velvet Marble Waffles Recipe Will Become Your Go-To
The Secret Behind Perfect Red Velvet Marble Waffles
What sets this Red Velvet Marble Waffles recipe apart is the perfect balance of flavors and textures. The combination of the rich, chocolatey cocoa powder, the subtle sweetness of the granulated sugar, and the vibrant red food coloring creates a visually stunning and delectable waffle that’s sure to impress. The key is in the technique – gently folding the batter to achieve the signature marbled effect, which adds a beautiful and unique touch to each waffle.
Essential Ingredients You’ll Need
To make these Red Velvet Marble Waffles, you’ll need a few key ingredients:
- 2 cups all-purpose flour: This provides the sturdy base for the waffles, ensuring they have a fluffy yet crisp texture.
- 2 tablespoons unsweetened cocoa powder: The cocoa powder adds a rich, chocolatey flavor that’s essential for the red velvet profile.
- 2 tablespoons granulated sugar: The sugar adds just the right amount of sweetness to balance the cocoa powder.
- 1 teaspoon baking powder: This helps the waffles rise and achieve their signature fluffy texture.
- 1/2 teaspoon baking soda: The baking soda reacts with the buttermilk to create a light and airy waffle.
- 1/4 teaspoon salt: A pinch of salt enhances all the other flavors in the batter.
- 2 large eggs: The eggs help bind the batter and contribute to the waffles’ structure.
- 1 1/2 cups buttermilk: The buttermilk lends a subtle tanginess and moisture to the waffles.
- 1/4 cup vegetable oil: The oil adds richness and helps create a crisp exterior.
- 1 teaspoon vanilla extract: The vanilla enhances the overall flavor profile.
- 2-3 drops red food coloring: The food coloring is the key to achieving that signature red velvet hue.
Step-by-Step Red Velvet Marble Waffles Instructions
Preparing Your Red Velvet Marble Waffles
Preparing these Red Velvet Marble Waffles is a breeze, with a prep time of just 15 minutes and a cook time of 15 minutes, for a total of 30 minutes from start to finish. You’ll need a waffle iron and a few basic kitchen tools to get started.
1- In a large mixing bowl, whisk together the 2 cups of all-purpose flour, 2 tablespoons of unsweetened cocoa powder, 2 tablespoons of granulated sugar, 1 teaspoon of baking powder, 1/2 teaspoon of baking soda, and 1/4 teaspoon of salt until well combined.
2- In a separate bowl, beat the 2 large eggs, then whisk in the 1 1/2 cups of buttermilk, 1/4 cup of vegetable oil, and 1 teaspoon of vanilla extract until the mixture is smooth and well-incorporated.
3- Gently fold the wet ingredients into the dry ingredients, being careful not to overmix. The batter should have a slightly lumpy consistency.
4- Finally, add 2-3 drops of red food coloring and gently fold it into the batter, creating a beautiful marbled effect.
5- Preheat your waffle iron and grease it lightly with non-stick cooking spray. Scoop the batter onto the hot waffle iron, using about 1/2 cup per waffle.
6- Cook the waffles for 3-4 minutes, or until they’re golden brown and crispy. Serve immediately, topped with your favorite toppings like whipped cream, fresh berries, or a drizzle of maple syrup.
Pro Tips for Success
- Don’t overmix the batter: Gently folding the wet and dry ingredients together is key to achieving the perfect texture. Overmixing can result in tough, dense waffles.
- Use room temperature ingredients: Allowing the eggs, buttermilk, and other cold ingredients to come to room temperature before mixing will help the batter come together more easily.
- Grease the waffle iron thoroughly: This will ensure the waffles release easily and develop a crisp exterior.
- Adjust the baking time as needed: Every waffle iron is different, so keep an eye on the waffles and adjust the cooking time accordingly.
- Serve the waffles immediately: These Red Velvet Marble Waffles are best enjoyed fresh off the iron, while they’re still warm and crisp.
Serving and Storing Your Red Velvet Marble Waffles
Perfect Pairings for Red Velvet Marble Waffles
These Red Velvet Marble Waffles are the ultimate showstopper for any brunch or breakfast spread. They pair beautifully with a variety of toppings and sides, such as freshly whipped cream, a drizzle of maple syrup, a sprinkle of powdered sugar, or a scoop of vanilla ice cream. For a more savory twist, serve them alongside crispy bacon, sausage links, or a fresh fruit salad. And don’t forget the beverage – a steaming cup of coffee or a refreshing glass of orange juice completes the perfect Red Velvet Marble Waffles experience. This recipe yields 6 servings, making it perfect for sharing with family and friends.
Storage and Make-Ahead Tips
If you have any leftover Red Velvet Marble Waffles, you can store them in an airtight container in the refrigerator for up to 3 days. To reheat, simply pop them in the toaster or oven at 350°F for a few minutes until they’re warm and crisp.
For longer-term storage, you can freeze the cooked waffles for up to 2 months. To freeze, let the waffles cool completely, then place them in a single layer on a baking sheet. Once frozen, transfer the waffles to an airtight container or resealable plastic bag. When you’re ready to enjoy them, simply reheat the frozen waffles in the toaster or oven until heated through.
If you want to get a head start on your Red Velvet Marble Waffles, you can prepare the dry ingredients in advance and store them in an airtight container. When you’re ready to make the waffles, simply whisk in the wet ingredients and proceed with the recipe.
Variations and Dietary Adaptations for Red Velvet Marble Waffles
Creative Red Velvet Marble Waffles Variations
While the classic Red Velvet Marble Waffles are a true delight, you can also get creative with a few fun twists:
- Chocolate Chip Red Velvet Marble Waffles: Fold in some semi-sweet chocolate chips into the batter for an extra indulgent treat.
- Peppermint Red Velvet Marble Waffles: Add a few drops of peppermint extract to the batter and top with crushed candy canes for a festive spin.
- Mocha Red Velvet Marble Waffles: Substitute 1 tablespoon of the cocoa powder with instant espresso powder for a delicious coffee-infused waffle.
Making Red Velvet Marble Waffles Diet-Friendly
For those with dietary restrictions, you can easily adapt this Red Velvet Marble Waffles recipe to suit your needs:
Gluten-Free: Replace the all-purpose flour with a 1:1 gluten-free flour blend. Be sure to adjust the baking time as needed, as gluten-free flour can sometimes require a bit more cooking.
Vegan: Substitute the eggs with flax or chia eggs (1 tablespoon ground flax or chia seeds mixed with 3 tablespoons of water), and use plant-based milk in place of the buttermilk. You may also need to adjust the baking powder and baking soda ratios to achieve the desired rise and texture.
Low-Carb: Instead of all-purpose flour, use a combination of almond flour and coconut flour. Reduce the amount of granulated sugar and consider using a keto-friendly sweetener instead.
Frequently Asked Questions
Q: Can I substitute the buttermilk with regular milk?
A: While you can use regular milk in a pinch, the buttermilk is essential for achieving the perfect texture and tang in these Red Velvet Marble Waffles. If you don’t have buttermilk on hand, you can make a simple substitute by mixing 1 1/2 cups of regular milk with 1 1/2 tablespoons of lemon juice or white vinegar.
Q: How do I ensure the waffles have the signature marble effect?
A: The key is to gently fold the wet and dry ingredients together, being careful not to overmix. This will help preserve the marbled appearance. Additionally, adding the red food coloring at the end and folding it in lightly will create the beautiful swirled pattern.
Q: Can I make the batter ahead of time?
A: While you can prepare the dry ingredients in advance, it’s best to mix the wet and dry ingredients just before cooking. The batter will start to lose its leavening power if it sits for too long, resulting in dense, flat waffles. For the best texture, make the batter right before cooking.
Q: How many servings does this recipe make?
A: This Red Velvet Marble Waffles recipe yields 6 servings. Depending on the size of your waffle iron, you may be able to get more or fewer waffles from the batter.
Q: My waffles are coming out soggy. What am I doing wrong?
A: Soggy waffles can be caused by a few things. Make sure your waffle iron is fully preheated and that you’re not overcrowding it. Additionally, avoid opening the lid too frequently during cooking, as this can cause the waffles to lose steam and become soggy.

Red Velvet Marble Waffles
- Total Time: 30
- Yield: 6 servings
Description
Indulge in the perfect balance of red velvet and marble with these easy, mouthwatering Red Velvet Marble Waffles – a decadent breakfast or brunch treat that’s sure to impress.
Ingredients
– 2 cups all-purpose flour
– 2 tablespoons unsweetened cocoa powder
– 2 tablespoons granulated sugar
– 1 teaspoon baking powder
– 1/2 teaspoon baking soda
– 1/4 teaspoon salt
– 2 large eggs
– 1 1/2 cups buttermilk
– 1/4 cup vegetable oil
– 1 teaspoon vanilla extract
– 2-3 drops red food coloring
Instructions
1. In a large bowl, whisk together the flour, cocoa powder, sugar, baking powder, baking soda, and salt.
2. In a separate bowl, beat the eggs. Then whisk in the buttermilk, vegetable oil, and vanilla extract.
3. Gently fold the wet ingredients into the dry ingredients, being careful not to overmix.
4. Scoop out about 1/4 cup of the batter and place it in one corner of the waffle iron. Scoop another 1/4 cup of batter in the opposite corner, creating a marble effect.
5. Cook the waffles according to your waffle iron’s instructions, typically 3-5 minutes, until golden brown and crispy.
6. Serve the red velvet marble waffles hot, with desired toppings like maple syrup, powdered sugar, or fresh berries.
Notes
For a richer, more intense red velvet flavor, you can increase the amount of cocoa powder to 3 tablespoons. You can also add a cream cheese frosting or a dusting of powdered sugar for an extra decadent touch.
- Prep Time: 15
- Cook Time: 15
- Category: Desserts
- Method: Baking
- Cuisine: American
Conclusion
These Red Velvet Marble Waffles are truly a breakfast masterpiece that will impress your family and friends. With their rich, chocolatey flavor, vibrant red hue, and fluffy yet crisp texture, they’re sure to become a new household favorite. The secret lies in the perfect balance of ingredients and the gentle folding technique that creates the stunning marbled effect.
Whether you’re hosting a special brunch or simply treating yourself on a lazy weekend, give this Red Velvet Marble Waffles recipe a try. I guarantee it will transport you to a world of nostalgic comfort and pure indulgence. Don’t forget to share your creations and tag me on social media – I can’t wait to see your beautiful, mouth-watering waffles!


