
I’ll never forget the first time I tasted pickled cherries. It was during a family gathering at my grandparents’ farmhouse, and the aroma of the tangy, sweet-and-sour cherries filled the air as soon as I stepped through the door. My grandmother, with her warm smile and twinkling eyes, ushered me into the kitchen and insisted I try her latest batch. One bite, and I was hooked. The explosion of flavors, the perfect balance of acidity and sweetness, the satisfying crunch – it was a revelation.
From that day on, I became obsessed with perfecting my own pickled cherries recipe. I experimented with different vinegars, spices, and techniques, always striving to capture that same magical combination of flavors that had so captivated me. And now, after years of practice and refinement, I’m thrilled to share with you the ultimate pickled cherries recipe – one that I’m confident will become your new go-to.
Why This Pickled Cherries Recipe Will Become Your Go-To
The Secret Behind Perfect Pickled Cherries
The secret to making truly outstanding pickled cherries lies in the perfect balance of sweet, sour, and savory flavors. It’s a delicate dance, but when you get it right, the result is nothing short of sublime. In this recipe, we’ve carefully calibrated the ratio of vinegar to sugar, and added just the right touch of warming spices to create a flavor profile that’s both complex and remarkably harmonious.
But it’s not just about the flavors – the texture is equally important. Perfectly pickled cherries should have a satisfying crunch, with each bite revealing the juicy, tender flesh within. To achieve this, we’ll be using a quick pickling method that retains the cherries’ structural integrity, while still allowing the brine to fully penetrate and infuse them with flavor.
Essential Ingredients You’ll Need
To craft this exceptional pickled cherries recipe, you’ll need a few key ingredients:
- 2 pounds fresh cherries, pitted: The star of the show, of course. Look for plump, juicy cherries at the peak of their season for the best flavor and texture.
- 1 cup white vinegar: The acidity provides the signature tanginess that balances the sweetness.
- 1/2 cup granulated sugar: Just the right amount to create a perfect sweet-and-sour interplay.
- 1 teaspoon whole black peppercorns: These add a subtle warmth and complexity to the brine.
- 1 bay leaf: An aromatic addition that lends depth and a subtle herbaceous note.
- 1/2 teaspoon salt: A simple seasoning that enhances the overall flavor profile.
Step-by-Step Pickled Cherries Instructions
Preparing Your Pickled Cherries
With just 15 minutes of prep time and 15 minutes of cooking, you can have a batch of these delectable pickled cherries ready in a total of 30 minutes. All you’ll need is a sharp paring knife, a medium saucepan, and a few basic kitchen tools.
1- Begin by carefully pitting the 2 pounds of fresh cherries. This step can take a bit of time, but the reward is well worth it. Work slowly and methodically, taking care not to damage the delicate fruit.
2- In a medium saucepan, combine the 1 cup of white vinegar, 1/2 cup of granulated sugar, 1 teaspoon of whole black peppercorns, and 1 bay leaf. Bring the mixture to a gentle simmer over medium heat, stirring occasionally until the sugar has fully dissolved.
3- Once the brine is ready, carefully add the pitted cherries to the pan. Allow the cherries to cook for 5-7 minutes, gently stirring occasionally, until they’ve softened slightly and the brine has begun to turn a beautiful ruby-red color.
4- Remove the pan from the heat and stir in the 1/2 teaspoon of salt. You’ll know the cherries are ready when they’ve developed a slight translucency and the brine has thickened ever so slightly.
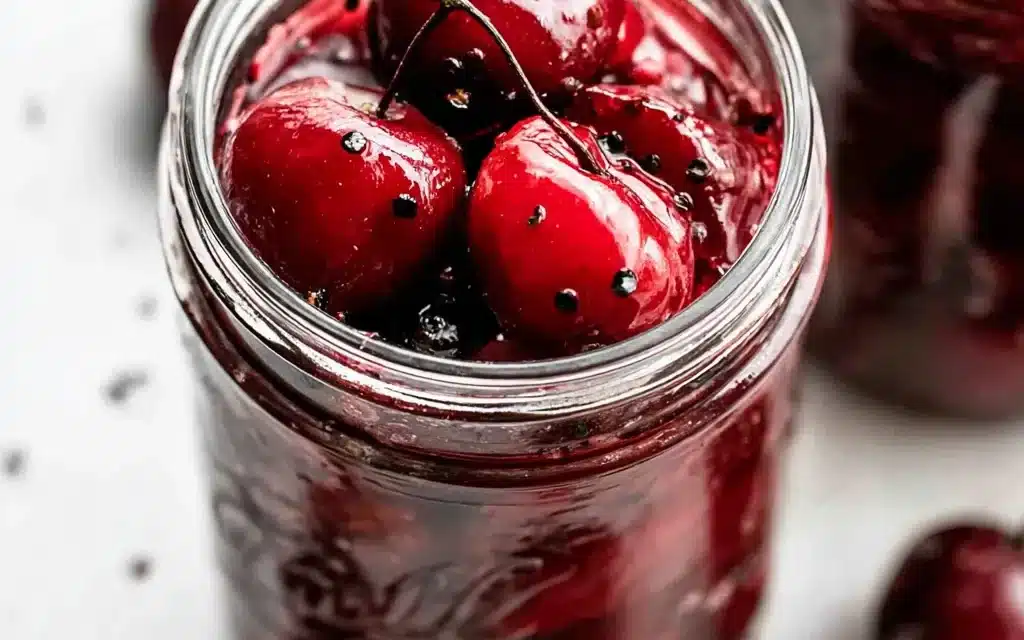
5- Using a slotted spoon, transfer the pickled cherries to a clean, heatproof jar or container. Carefully pour the hot brine over the cherries, making sure they’re fully submerged.
6- Allow the pickled cherries to cool completely at room temperature, then cover and refrigerate for at least 2 hours (or up to 2 weeks) before serving. The flavors will continue to develop and meld together the longer they sit.
Pro Tips for Success
- Use the freshest, ripest cherries you can find for maximum flavor.
- Take the time to carefully pit the cherries – this step is crucial for achieving the perfect texture.
- Don’t be tempted to overcook the cherries; you want them to retain a pleasant bite, not become mushy.
- Adjust the sugar and vinegar levels to suit your personal taste preferences.
- Consider adding other spices, like cinnamon sticks or allspice berries, for additional complexity.
- Sterilize your jars or containers to ensure a longer shelf life for your pickled cherries.
- Be patient and let the flavors develop fully before digging in – the wait will be worth it!
Serving and Storing Your Pickled Cherries
Perfect Pairings for Pickled Cherries
These pickled cherries are incredibly versatile and can be enjoyed in a variety of ways. Serve them as a unique and flavorful condiment alongside roasted meats, charcuterie boards, or even creamy cheeses. They also make a delightful addition to salads, grain bowls, or even atop a scoop of vanilla ice cream for a sweet-and-sour treat.
For a truly special pairing, try serving the pickled cherries alongside a crisp, dry white wine or a refreshing gin and tonic. The acidity and sweetness of the cherries will beautifully complement the botanical notes in these beverages. And with this recipe yielding 12 servings, you’ll have plenty to share with family and friends at your next gathering.
Storage and Make-Ahead Tips
One of the best things about pickled cherries is that they keep incredibly well. Once cooled, transfer the cherries and their brine to a clean, airtight container and refrigerate for up to 2 weeks. The longer they sit, the more the flavors will develop and meld together.
If you’d like to prepare the pickled cherries in advance, simply follow the recipe all the way through and store the sealed container in the fridge. They’ll stay fresh and flavorful for up to 2 weeks, making them a perfect make-ahead option for parties, potlucks, or last-minute entertaining.
When you’re ready to serve, simply remove the cherries from the fridge and let them come to room temperature. The texture and flavor will be just as delightful as the day you made them.
Variations and Dietary Adaptations for Pickled Cherries
Creative Pickled Cherries Variations
While this classic pickled cherries recipe is already a flavor sensation, there’s always room for a bit of creativity. Try swapping out the white vinegar for a more complex sherry or red wine vinegar. Or experiment with different spice combinations, like adding a cinnamon stick, a few cloves, or a pinch of crushed red pepper flakes.
For a seasonal twist, consider using a mix of cherries and other stone fruits, like plums or apricots, for a delightful summer medley. Or, for a winter-friendly version, try pickling tart Montmorency cherries instead of the classic sweet variety.
Making Pickled Cherries Diet-Friendly
If you’re watching your sugar intake or following a specific dietary plan, this pickled cherries recipe can easily be adapted to suit your needs. For a lower-sugar version, try substituting the granulated sugar with your preferred sugar substitute, such as erythritol or monk fruit sweetener. Just be sure to adjust the sweetness to taste.
For a gluten-free option, simply confirm that the vinegar you’re using is certified gluten-free. And for a vegan twist, simply omit the honey and use an equal amount of maple syrup or agave nectar instead.
No matter how you choose to customize your pickled cherries, the key is to have fun and let your creativity shine through. The possibilities are endless!
Frequently Asked Questions
Q: Can I use a different type of vinegar besides white vinegar?
A: Absolutely! While the recipe calls for white vinegar, you can experiment with other types of vinegar to create unique flavor profiles. Try using apple cider vinegar, red wine vinegar, or even a combination of vinegars.
Q: How long do I need to cook the cherries?
A: The total cooking time for the cherries is 15 minutes. You’ll want to gently simmer them in the brine for 5-7 minutes, until they’ve softened slightly and the brine has thickened.
Q: Can I make these pickled cherries ahead of time?
A: Yes, pickled cherries are a fantastic make-ahead option. Once cooled, transfer the cherries and brine to an airtight container and refrigerate for up to 2 weeks. The flavors will continue to develop the longer they sit.
Q: How many servings does this recipe make?
A: This pickled cherries recipe yields 12 servings. The portion size can vary depending on how you choose to serve them, but a general guideline is 2-3 tablespoons per serving.
Q: What if my cherries start to turn soft or mushy?
A: If your pickled cherries start to lose their texture, it’s likely due to overcooking. Next time, be sure to only simmer the cherries for 5-7 minutes, until they’ve softened slightly but still have a satisfying crunch.

Pickled Cherries
- Total Time: 30
- Yield: 12 servings
Description
Discover the easy, restaurant-quality recipe for Pickled Cherries – a versatile condiment that adds a tangy, sweet burst of flavor to your meals. These homemade pickled cherries are perfect for topping cheese boards, charcuterie platters, or even enjoying as a tangy-sweet snack.
Ingredients
– 2 pounds fresh cherries, pitted
– 1 cup white vinegar
– 1/2 cup granulated sugar
– 1 teaspoon whole black peppercorns
– 1 bay leaf
– 1/2 teaspoon salt
Instructions
1. In a medium saucepan, combine the vinegar, sugar, peppercorns, bay leaf, and salt. Bring the mixture to a boil, stirring occasionally until the sugar has dissolved.
2. Add the pitted cherries to the hot vinegar mixture and stir to coat. Remove the pan from heat and let the cherries cool completely in the liquid, about 30 minutes.
3. Transfer the pickled cherries and their liquid to a clean, sterilized jar. Seal the jar and refrigerate for at least 2 hours, or up to 2 weeks.
Notes
For best flavor, let the pickled cherries marinate in the refrigerator for at least 2 hours before serving. The pickled cherries will keep for up to 2 weeks in the refrigerator. Enjoy them as a unique condiment, topping for cheese boards, or even a tangy-sweet snack.
- Prep Time: 15
- Cook Time: 15
- Category: Dips, Boards & Drinks
- Method: Stovetop
- Cuisine: American
Conclusion
Pickled cherries are a true culinary treasure – a delightful balance of sweet, sour, and savory that can elevate a wide variety of dishes. With this easy, foolproof recipe, you’ll be able to capture that same magical flavor combination that so captivated me all those years ago.
I encourage you to give this recipe a try and experience the joy of homemade pickled cherries for yourself. They’re sure to become a staple in your kitchen, whether you’re serving them as a unique condiment, incorporating them into your favorite recipes, or simply enjoying them as a satisfying snack.
So what are you waiting for? Grab some fresh cherries and let’s get pickling! I can’t wait to hear about your experience and how you’ve made this recipe your own. Happy cooking!


