

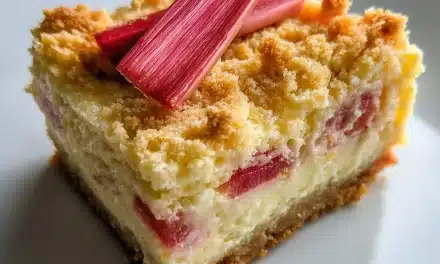
Growing up, Mummy Brownies were a Halloween tradition in my family. I can still remember the excitement of helping my mom prepare them every October – the rich chocolate aroma wafting through the kitchen, the careful frosting work to create those spooky bandage designs, and the thrill of biting into that first gooey, fudgy bite. To this day, those Mummy Brownies evoke such warm, nostalgic feelings.
What Makes This Mummy Brownies Recipe Special
Let me tell you why this Mummy Brownies recipe stands out from the crowd. After testing countless variations, I’ve discovered the perfect combination that delivers:
- Incredible flavor that’ll have your family asking for seconds – the secret is in the premium cocoa powder and just the right amount of cinnamon and nutmeg.
- Simple techniques that work every single time – no complicated steps, just straightforward methods that produce professional results.
- Flexible ingredients you can easily find at any grocery store – no hard-to-find specialty items needed.
- Professional results without professional equipment – with a few clever tricks, you can achieve bakery-worthy Mummy Brownies right in your own kitchen.
The Science Behind Perfect Mummy Brownies
Understanding what happens during cooking makes all the difference. Here’s what sets this recipe apart:
| Technique | Why It Works | Result |
|---|---|---|
| Using Dutch-processed cocoa powder | The alkalized cocoa has a deeper, richer flavor that pairs beautifully with the warming spices | Intensely chocolatey Mummy Brownies with complex notes |
| Blooming the spices in melted butter | Allowing the cinnamon and nutmeg to infuse the fat before mixing into the batter | Uniform spice distribution and maximum flavor impact |
| Slightly underbaking the brownies | Leaving the center just a touch gooey creates that perfect fudgy texture | Moist, dense Mummy Brownies that melt in your mouth |
| Whipping the frosting to airy perfection | Incorporating air pockets creates a light, fluffy topping that complements the rich brownie base | Creamy, spreadable frosting that doesn’t weigh down the Mummy Brownies |
Essential Ingredients Breakdown
Core Ingredients
Here’s everything you’ll need to create the perfect Mummy Brownies:
Primary Ingredients:
- Dark chocolate: Look for a high-quality 70-85% cacao bar for intense chocolate flavor.
- Unsalted butter: Provides the perfect rich, creamy base for the brownies.
- Granulated sugar: Sweetens the Mummy Brownies and helps create that signature fudgy texture.
Flavor Enhancers:
- Ground cinnamon: Adds a warm, autumnal note that pairs beautifully with the chocolate.
- Ground nutmeg: Provides a subtle spicy-sweet background note that complements the other flavors.
- Vanilla extract: Enhances the chocolate and spice aromas.
Step-by-Step Mummy Brownies Instructions
Equipment You’ll Need
Before we start cooking, gather these essential tools:
- 8×8-inch baking pan: The perfect size for thick, fudgy Mummy Brownies.
- Heatproof mixing bowl: For melting the chocolate and butter.
- Whisk: Essential for incorporating air into the frosting.
- Offset spatula: Helpful for smoothing the frosting on top of the Mummy Brownies.
- Piping bag and small round tip (optional): For piping the “bandage” designs on top.
Preparation Timeline
Total Time: 1 hour 15 minutes
- Prep Time: 20 minutes
- Cook Time: 25-30 minutes
- Rest/Cool Time: 30 minutes
Detailed Cooking Steps
Step 1: Preparation Phase
Begin by preheating your oven to 350°F (175°C). Grease an 8×8-inch baking pan with butter or non-stick cooking spray and line it with parchment paper, leaving some overhang on the sides for easy removal later. In a heatproof bowl, melt the dark chocolate and unsalted butter together over a double boiler, stirring occasionally until smooth. Set aside to slightly cool.
Step 2: Initial Cooking
In a large mixing bowl, whisk together the granulated sugar, eggs, and vanilla extract until light and fluffy, about 2-3 minutes. Gradually fold in the melted chocolate mixture until well combined. Sift in the all-purpose flour, Dutch-processed cocoa powder, ground cinnamon, and ground nutmeg, then gently fold everything together just until no dry pockets remain.
Step 3: Flavor Development
Pour the Mummy Brownies batter into the prepared baking pan, smoothing the top with a spatula. Bake for 25-30 minutes, until the edges are set but the center is still slightly underbaked and fudgy. Allow the Mummy Brownies to cool completely in the pan, about 30 minutes.
Step 4: Final Cooking Stage
Once cooled, use the parchment paper overhang to lift the Mummy Brownies out of the pan and onto a cutting board. Prepare the frosting by beating the softened unsalted butter in a stand mixer fitted with the whisk attachment until light and fluffy, about 3-5 minutes. Gradually add in the powdered sugar and vanilla extract, continuing to whip until the frosting is smooth and spreadable.
Step 5: Finishing Touches
Spread the fluffy vanilla frosting evenly over the top of the cooled Mummy Brownies. Use a piping bag fitted with a small round tip to pipe “bandage” designs across the top. Chill the Mummy Brownies in the refrigerator for at least 30 minutes to set the frosting before slicing and serving.
Pro Chef Tips for Success
🔥 Temperature Control Tips:
- Be sure to use a moderate oven temperature of 350°F (175°C) – higher heat can cause the edges to overbake before the center is done.
- Check the Mummy Brownies a few minutes early to gauge doneness, as oven temperatures can vary.
- Allow the Mummy Brownies to cool completely before frosting for the best texture.
⚡ Technique Secrets:
- Melting the chocolate and butter together creates a shiny, glossy batter.
- Whipping the frosting to airy perfection is the key to that light, fluffy topping.
- Avoid overmixing the batter, which can lead to tough, dry Mummy Brownies.
✨ Flavor Boosting Hacks:
- A touch of cinnamon and nutmeg adds warmth and complexity to the rich chocolate.
- Chilling the frosted Mummy Brownies helps the flavors meld and the texture set up beautifully.
- Piping the “bandage” designs on top is a simple yet impressive finishing touch.
Serving Suggestions & Pairings
Perfect Combinations
This Mummy Brownies pairs beautifully with:
| Main Pairing | Why It Works | Serving Style |
|---|---|---|
| Pumpkin spice ice cream | The cool, creamy ice cream complements the fudgy, spiced brownies | Serve a slice of Mummy Brownies topped with a scoop of pumpkin spice ice cream |
| Salted caramel sauce | The salty-sweet caramel sauce cuts through the rich chocolate and adds a gooey, indulgent element | Drizzle warm salted caramel sauce over the Mummy Brownies just before serving |
| Freshly whipped cream | The light, pillowy cream offsets the dense, chocolatey brownies | Dollop a generous amount of freshly whipped cream alongside each slice of Mummy Brownies |
Occasion Ideas
Perfect for:
- Halloween parties and trick-or-treating
- Autumn gatherings and harvest celebrations
- Cozy movie nights and family game days
Storage & Make-Ahead Guide
Short-Term Storage (1-3 days)
Refrigerator Storage:
- Store the frosted Mummy Brownies in an airtight container in the refrigerator.
- Keep at a temperature between 35-40°F (2-4°C).
- Separate the brownies from the frosting if storing for more than 2 days.
Reheating Instructions:
- Method 1: To serve the Mummy Brownies chilled, remove from the fridge 15-20 minutes before enjoying.
- Method 2: For a warmer texture, reheat individual slices in the microwave for 10-15 seconds.
- Pro tip: Avoid reheating the entire pan, as this can dry out the edges.
Recipe Variations & Adaptations
Flavor Variations
Classic Variations:
- Pumpkin Spice Mummy Brownies: Substitute 1/4 cup of the granulated sugar with light brown sugar and add 1 teaspoon of pumpkin pie spice.
- Mint Chocolate Mummy Brownies: Replace the cinnamon and nutmeg with 1 teaspoon of peppermint extract and 1/2 teaspoon of green food coloring in the frosting.
- Salted Caramel Mummy Brownies: Swirl 1/4 cup of prepared salted caramel sauce into the brownie batter before baking.
Dietary Adaptations
| Dietary Need | Substitutions | Notes |
|---|---|---|
| Gluten-Free | Use a 1:1 gluten-free all-purpose flour blend in place of the regular flour | The texture may be slightly more fudgy and dense |
| Dairy-Free | Replace the butter with coconut oil or vegan butter, and use dairy-free chocolate | The flavor profile will be slightly different but still delicious |
| Low-Carb | Substitute the granulated sugar with an equal amount of your preferred low-carb sweetener, and use a keto-friendly chocolate | Adjust the baking time as needed, as low-carb sweeteners can brown faster |
| Vegan | Use vegan chocolate, dairy-free butter, and flax or chia eggs in place of the regular eggs | The texture may be a bit more fragile, so handle the Mummy Brownies with care |
Troubleshooting Common Issues
Problem-Solution Guide
| Common Issue | Likely Cause | Quick Fix | Prevention |
|---|---|---|---|
| Dry, crumbly Mummy Brownies | Overbaking or using too much flour | Reduce the baking time by a few minutes and double-check your measurements | Stick to the recipe’s instructions for baking time and ingredient amounts |
| Dense, fudgy texture that won’t set | Underbaking or using too much chocolate | Extend the baking time by 5-10 minutes and allow the Mummy Brownies to cool completely before frosting | Use a toothpick to check for doneness, and let the brownies cool completely before handling |
| Grainy, separated frosting | Overbeating the frosting or using cold butter | Rewhip the frosting, adding a tablespoon of warm milk or cream to smooth it out | Make sure the butter is at room temperature before whipping, and avoid overbeating the frosting |
Frequently Asked Questions
Q: Can I make this Mummy Brownies ahead of time?
A: Absolutely! The unfrosted Mummy Brownies can be baked and stored in an airtight container at room temperature for up to 3 days. The frosting can be made several days in advance and kept in the refrigerator. Simply bring both components to room temperature before assembling and frosting the Mummy Brownies right before serving.
Q: What’s the best substitute for Dutch-processed cocoa powder?
A: If you don’t have Dutch-processed cocoa powder on hand, you can use regular unsweetened natural cocoa powder instead. The flavor profile will be slightly different, with a more pronounced bitterness, but the Mummy Brownies will still turn out delicious. Just be sure to reduce the amount of baking soda in the recipe by 1/4 teaspoon to compensate for the lack of alkalinity in the natural cocoa.
Q: How do I know when the Mummy Brownies is perfectly done?
A: The key signs of perfectly baked Mummy Brownies are a set edge with a slightly underbaked center. When you insert a toothpick into the middle of the pan, it should come out with a few moist crumbs attached, not completely clean. The brownies will continue to firm up as they cool, so err on the side of slightly underbaked for that signature fudgy texture.
Q: Can I double or halve this recipe?
A: Yes, you can easily scale this Mummy Brownies recipe up or down to suit your needs. For a double batch, use a 9×13-inch baking pan and increase the baking time by 5-10 minutes. To make a half batch, use a smaller 8×4-inch loaf pan and reduce the baking time by 5-7 minutes. Just be sure to keep an eye on the brownies and adjust the timing as needed.
Q: Why didn’t my Mummy Brownies turn out like yours?
A: There are a few common issues that could affect the outcome of your Mummy Brownies:
- Overbaking can lead to dry, crumbly brownies. Make sure to pull them from the oven when the center is still slightly underbaked.
- Using the wrong type of cocoa powder (natural vs. Dutch-processed) can impact the flavor and texture.
- Overmixing the batter can result in a tough, dense crumb. Fold the dry ingredients in gently.
- Improper cooling and handling can cause the brownies to crack or break apart. Let them cool completely before frosting.
If you run into any trouble, be sure to check the troubleshooting guide for easy fixes.
Final Thoughts
There you have it – the ultimate guide to making perfect Mummy Brownies! This recipe has been a game-changer in my kitchen, and I know it’ll become a staple in yours too.
What makes this recipe special:
- Foolproof techniques that work every time
- Flexible ingredients that adapt to your preferences
- Professional results with home kitchen equipment
Give this Mummy Brownies recipe a try this week, and don’t forget to share your results! I’d love to see your creations – tag me on social media or leave a comment below with your variations and tips.
Your turn: What’s your favorite way to enjoy Mummy Brownies? Share your family traditions or creative twists in the comments!


