
Growing up, I always looked forward to the summer months when fresh strawberries would fill the markets. My grandma would make the most incredible strawberry hand pies, and the sweet aroma would fill the entire house. There was something so special about those little pockets of goodness – the flaky crust, the juicy berries, and the touch of sugar that made them truly irresistible. It’s a memory I cherish to this day, and that’s why I’m so excited to share this recipe for Love Letter Strawberry Hand Pies.
Why This Love Letter Strawberry Hand Pies Recipe Will Become Your Go-To
The Secret Behind Perfect Love Letter Strawberry Hand Pies
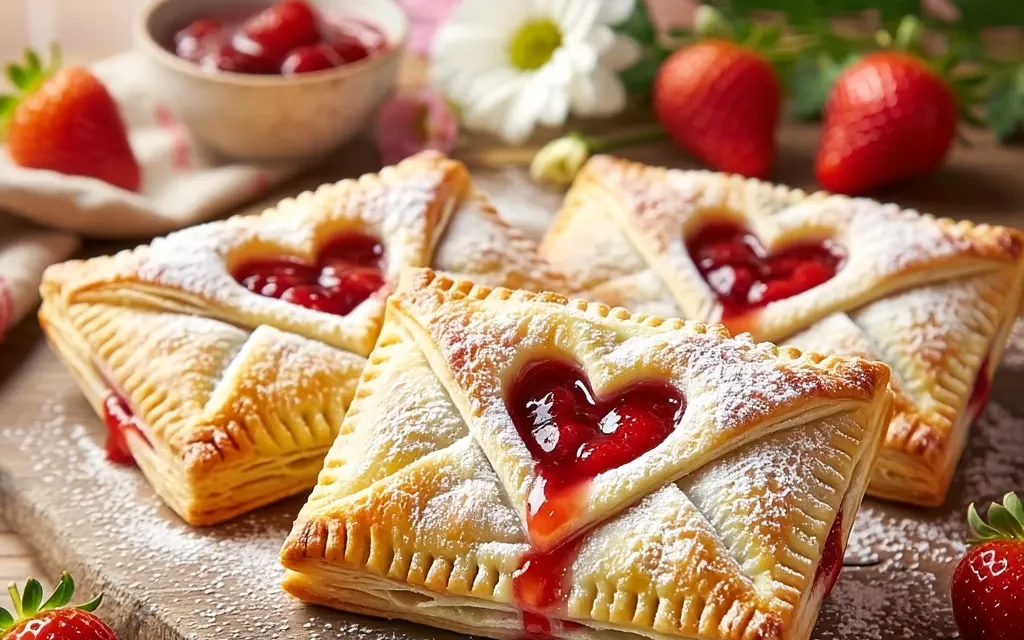
These Love Letter Strawberry Hand Pies are like a little taste of heaven. The secret lies in the flaky, buttery crust that perfectly complements the sweet and juicy strawberry filling. The cornstarch in the filling helps to create a delightful jammy texture, while the touch of sugar enhances the natural sweetness of the berries. Plus, the egg wash on top gives the pies a beautiful golden-brown finish that’s simply irresistible.
Essential Ingredients You’ll Need
- 2 cups all-purpose flour: This flour creates the perfect base for the tender, flaky crust.
- 1/2 teaspoon salt: A small amount of salt helps to balance the sweetness and enhance the overall flavor.
- 1 cup unsalted butter, cold and cubed: Using cold, cubed butter is key for achieving that signature flakiness in the dough.
- 1/4 cup ice water: Adding just the right amount of ice-cold water helps to bind the dough together without making it too sticky.
- 2 cups fresh strawberries, hulled and sliced: Fresh, ripe strawberries are the star of the show, providing a burst of juicy sweetness.
- 1/2 cup granulated sugar: The sugar helps to enhance the natural sweetness of the strawberries and create a delightful filling.
- 2 tablespoons cornstarch: The cornstarch acts as a thickener, giving the strawberry filling a delightful jammy texture.
- 1 egg, beaten with 1 tablespoon water for egg wash: The egg wash adds a beautiful golden-brown color and shine to the hand pies.
Step-by-Step Love Letter Strawberry Hand Pies Instructions
Preparing Your Love Letter Strawberry Hand Pies
With a prep time of just 15 minutes and a cook time of 20 minutes, these Love Letter Strawberry Hand Pies come together in a total of 35 minutes. You’ll need a few basic kitchen tools, like a rolling pin, a baking sheet, and a paring knife. Let’s get started!
1- Begin by making the dough. In a large bowl, combine the all-purpose flour and salt. Add the cold, cubed butter and use your fingertips to work it into the flour until the mixture resembles coarse crumbs. Slowly add the ice water, mixing just until the dough comes together.
2- On a lightly floured surface, roll the dough out to about 1/8-inch thickness. Use a 3-inch round cookie cutter (or the rim of a glass) to cut out circles from the dough. Carefully transfer the circles to a parchment-lined baking sheet, spacing them about 1 inch apart.
3- In a medium bowl, gently toss the sliced strawberries with the granulated sugar and cornstarch until the berries are evenly coated. Place a heaping tablespoon of the strawberry mixture in the center of each dough circle.
4- Fold the dough over the filling to create a half-moon shape, and use a fork to crimp and seal the edges. Brush the tops of the hand pies with the egg wash.
5- Bake the Love Letter Strawberry Hand Pies in a preheated 400°F oven for 18 to 20 minutes, or until the crust is golden brown and the filling is bubbling.
6- Remove the hand pies from the oven and let them cool on the baking sheet for a few minutes before transferring to a wire rack. Serve these delightful treats warm or at room temperature, and enjoy the perfect balance of flaky crust and sweet, juicy strawberry filling.
Pro Tips for Success
- Keep the butter cold: This is the key to achieving a flaky, tender crust. Work quickly with the dough to prevent the butter from melting.
- Don’t overfill the hand pies: Too much filling can cause the dough to tear or leak during baking. Stick to about a tablespoon of filling per pie.
- Crimp the edges well: Use a fork to firmly press and seal the edges of the hand pies, ensuring the filling stays inside during baking.
- Bake on a preheated oven: Having the oven at the correct temperature from the start will help the hand pies bake evenly and develop that beautiful golden-brown crust.
- Let them cool slightly before serving: This allows the filling to set, preventing a mess when you bite into the hand pies.
Serving and Storing Your Love Letter Strawberry Hand Pies
Perfect Pairings for Love Letter Strawberry Hand Pies
These Love Letter Strawberry Hand Pies are the perfect treat to enjoy on their own, but they also pair beautifully with a scoop of vanilla ice cream or a dollop of freshly whipped cream. For a refreshing contrast, try serving them alongside a cold glass of lemonade or iced tea. These hand pies are sure to be a hit at any summer gathering, whether it’s a backyard barbecue or a cozy picnic.
Storage and Make-Ahead Tips
The Love Letter Strawberry Hand Pies can be stored in an airtight container at room temperature for up to 3 days. For longer storage, place them in the refrigerator, where they’ll keep for up to 5 days. To reheat, simply pop them in the oven at 350°F for 5-7 minutes until warmed through.
If you’d like to get a head start, you can prepare the dough in advance and keep it refrigerated for up to 3 days or frozen for up to 3 months. When ready to assemble, thaw the dough in the refrigerator overnight and then proceed with the recipe. You can also fully bake the hand pies and freeze them for up to 2 months. Just reheat them straight from the freezer in the oven until heated through.
Variations and Dietary Adaptations for Love Letter Strawberry Hand Pies
Creative Love Letter Strawberry Hand Pies Variations
While the classic strawberry filling is simply divine, you can get creative with these Love Letter Strawberry Hand Pies. Try substituting the strawberries for other seasonal fruits, like blueberries, peaches, or even a mix of berries. You could also add a dollop of cream cheese to the filling for a delightful twist. For a more decadent version, drizzle the baked hand pies with a simple glaze or dust them with powdered sugar.
Making Love Letter Strawberry Hand Pies Diet-Friendly
To make these Love Letter Strawberry Hand Pies gluten-free, replace the all-purpose flour with a high-quality gluten-free flour blend. You can also make them vegan by using a plant-based butter substitute and skipping the egg wash. For a lower-carb option, swap the granulated sugar for a keto-friendly sweetener and reduce the amount of fruit used in the filling.
Frequently Asked Questions
Q: Can I use frozen strawberries instead of fresh?
A: Yes, you can use frozen strawberries in this recipe. Just be sure to thaw and drain them well before using, as the extra moisture can affect the texture of the filling.
Q: How long does the dough need to be refrigerated?
A: The dough needs to be refrigerated for at least 30 minutes before rolling and assembling the hand pies. This helps the gluten relax and the butter firm up, ensuring a flaky crust.
Q: Can I make the hand pies in advance?
A: Yes, you can fully bake the hand pies and freeze them for up to 2 months. To reheat, simply place them on a baking sheet and warm them in a 350°F oven for 5-7 minutes until heated through.
Q: How many hand pies does this recipe make?
A: This recipe yields 12 delicious Love Letter Strawberry Hand Pies, perfect for sharing with family and friends.
Q: What if my dough is too sticky to work with?
A: If the dough seems too sticky, try adding a tablespoon or two of extra flour as you’re rolling it out. You can also lightly flour your work surface to prevent sticking.

Love Letter Strawberry Hand Pies
- Total Time: 35
- Yield: 12 hand pies
Description
Indulge in the irresistible flavors of these Love Letter Strawberry Hand Pies – a delightful, flaky treat that’s perfect for any occasion.
Ingredients
2 cups all-purpose flour
1/2 teaspoon salt
1 cup unsalted butter, cold and cubed
1/4 cup ice water
2 cups fresh strawberries, hulled and sliced
1/2 cup granulated sugar
2 tablespoons cornstarch
1 egg, beaten with 1 tablespoon water for egg wash
Instructions
1. In a large bowl, combine the flour and salt. Cut in the cold butter until the mixture resembles coarse crumbs. Gradually add the ice water, mixing just until the dough comes together.
2. Divide the dough into two equal parts, shape each into a disk, wrap in plastic, and refrigerate for at least 30 minutes.
3. In a medium bowl, toss the sliced strawberries with the sugar and cornstarch.
4. On a lightly floured surface, roll out one disk of dough to 1/8-inch thickness. Cut into heart shapes using a 3-inch cookie cutter.
5. Place a heaping tablespoon of the strawberry mixture in the center of each heart. Top with another heart-shaped dough piece and crimp the edges with a fork to seal.
6. Arrange the hand pies on a parchment-lined baking sheet. Brush the tops with the egg wash.
7. Bake at 400°F for 18-20 minutes, until the crust is golden brown. Allow to cool for 5 minutes before serving.
Notes
For a flakier crust, you can chill the hand pies for 30 minutes before baking. Serve these Love Letter Strawberry Hand Pies warm or at room temperature.
- Prep Time: 15
- Cook Time: 20
- Category: Cookies, Bars & Brownies
- Method: Baking
- Cuisine: American
Conclusion
These Love Letter Strawberry Hand Pies are a true labor of love, but the end result is so worth it. The flaky crust, the sweet and juicy filling, and the beautiful golden-brown finish make these hand pies an irresistible treat that’s sure to become a family favorite. I hope you’ll give this recipe a try and experience the same joy and nostalgia that I feel every time I take a bite. Don’t forget to share your creations and let me know what you think!


