
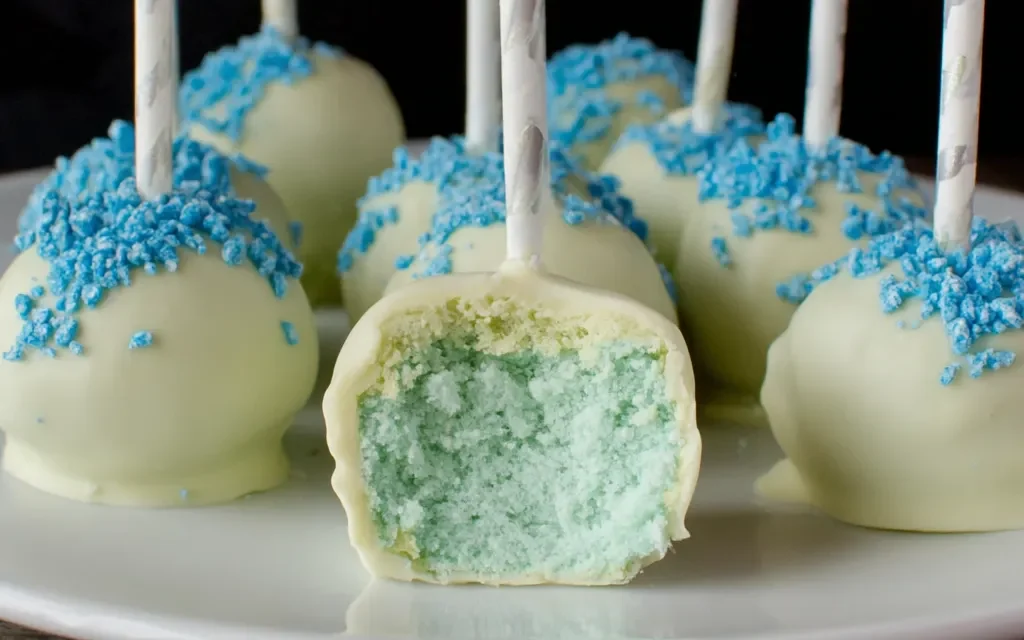
The first time I made Glacier Blue Velvet Cake Pops, it was for my daughter’s 8th birthday party. I remember the excitement on her face as she watched the vibrant blue cake batter transform into perfectly round, bite-sized treats. She couldn’t wait to take the first bite and see the soft, velvety interior. Needless to say, the Glacier Blue Velvet Cake Pops were the star of the show that day, and they’ve become a family favorite ever since.
Why This Glacier Blue Velvet Cake Pops Recipe Will Become Your Go-To
The Secret Behind Perfect Glacier Blue Velvet Cake Pops
What makes this Glacier Blue Velvet Cake Pops recipe truly special is the combination of rich, moist blue velvet cake and the creamy, indulgent cream cheese frosting. The blue food coloring creates a mesmerizing, almost icy look that’s sure to capture everyone’s attention. But the real magic happens when you take that first bite and experience the perfect balance of flavors and textures. The cake is tender and velvety, while the cream cheese frosting adds a luxurious creaminess that melts in your mouth. It’s a truly irresistible treat that’s perfect for any occasion, from birthday parties to holiday gatherings.
Essential Ingredients You’ll Need
To make these Glacier Blue Velvet Cake Pops, you’ll need a few key ingredients:
- 1 box (15.25 oz) blue velvet cake mix: This provides the rich, velvety cake base that’s the foundation of the pops.
- 1/2 cup water, 1/2 cup vegetable oil, and 3 large eggs: These standard cake mix ingredients ensure the cake has the perfect moisture and texture.
- 8 oz cream cheese, softened: This is the secret to the luscious, creamy frosting that takes the cake pops to the next level.
- 1 1/2 cups powdered sugar: Sweetens and binds the cream cheese frosting.
- 2 cups white candy melts: These create the hard, glossy coating that gives the Glacier Blue Velvet Cake Pops their signature look.
- Blue food coloring (gel or liquid): Adds the beautiful, icy blue hue that makes these cake pops so visually stunning.
Step-by-Step Glacier Blue Velvet Cake Pops Instructions
Preparing Your Glacier Blue Velvet Cake Pops
With a total prep and cook time of just 45 minutes, these Glacier Blue Velvet Cake Pops come together quickly. You’ll need a few pieces of equipment, including a mixing bowl, hand mixer, baking pan, cake pop maker or baking sheet, and a microwave for melting the candy coating. Let’s dive into the step-by-step instructions to create these irresistible treats.
1- Preheat your oven to 350°F and grease a 9×13-inch baking pan. In a large mixing bowl, combine the blue velvet cake mix, water, vegetable oil, and eggs. Beat with a hand mixer on medium speed for about 2 minutes, until the batter is smooth and well-combined.
2- Pour the blue velvet cake batter into the prepared baking pan and bake for 30 minutes, or until a toothpick inserted in the center comes out clean. Allow the cake to cool completely on a wire rack.
3- Once the cake is cooled, use your hands to crumble it into a large bowl. Add the softened cream cheese and powdered sugar, then mix everything together until a smooth, uniform dough forms.
4- Scoop the cake pop dough by the tablespoonful and roll them into neat, round balls. Place the cake pops on a baking sheet or in a cake pop maker and refrigerate for at least 30 minutes to firm up.
5- Melt the white candy melts in the microwave according to the package instructions, stirring frequently until smooth. Add a few drops of blue food coloring and stir until the coating is an even, vibrant blue color.
6- Remove the chilled cake pops from the refrigerator. Using a fork or cake pop stick, dip each pop into the blue candy coating, allowing any excess to drip off. Place the coated cake pops back on the baking sheet and refrigerate until the coating is set, about 10 minutes.
Pro Tips for Success
- For an extra smooth and creamy texture, use full-fat cream cheese and make sure it’s at room temperature before mixing.
- If the cake pop dough seems too dry, add a tablespoon of water or milk and mix until it reaches the right consistency.
- Chill the cake pops thoroughly before dipping to ensure the coating sets properly and doesn’t drip.
- Experiment with different shades of blue food coloring to find the perfect “glacier” hue you’re looking for.
- Use a small cookie scoop or melon baller to portion the cake pop dough evenly.
Serving and Storing Your Glacier Blue Velvet Cake Pops
Perfect Pairings for Glacier Blue Velvet Cake Pops
These Glacier Blue Velvet Cake Pops are the perfect treat to serve at any celebration, from birthday parties to baby showers. With 24 pops per batch, they’re great for sharing. For a delightful pairing, serve the cake pops alongside a hot cup of coffee or tea. The rich, velvety flavors of the cake complement the warmth of the beverage beautifully. You can also offer a selection of fresh berries, like blueberries or raspberries, to add a refreshing contrast to the sweetness of the pops.
Storage and Make-Ahead Tips
Luckily, Glacier Blue Velvet Cake Pops are easy to make ahead and store for later. Once the pops are coated and chilled, you can keep them in an airtight container in the refrigerator for up to 1 week. For longer storage, place the cake pops in a single layer in a freezer-safe container and freeze for up to 3 months. When ready to serve, thaw the frozen cake pops in the refrigerator overnight before bringing them to room temperature.
Variations and Dietary Adaptations for Glacier Blue Velvet Cake Pops
Creative Glacier Blue Velvet Cake Pops Variations
While the classic Glacier Blue Velvet Cake Pops are a showstopper, you can easily customize them to fit any occasion or taste preference. For a festive touch, try rolling the pops in crushed candy canes or sprinkling them with edible glitter. You can also experiment with different candy coatings, like white chocolate or even dark chocolate, for a richer flavor. If you’re feeling extra creative, try swirling the blue candy coating with white for a marbled effect.
Making Glacier Blue Velvet Cake Pops Diet-Friendly
To make these Glacier Blue Velvet Cake Pops more diet-friendly, you can try a few simple substitutions. For a gluten-free version, use a gluten-free blue velvet cake mix. To make them vegan, replace the cream cheese with a dairy-free cream cheese alternative and the white candy melts with vegan-friendly candy coating. For a low-carb option, use a sugar-free blue velvet cake mix and substitute the powdered sugar with a low-carb sweetener.
Frequently Asked Questions
Q: Can I use a homemade blue velvet cake recipe instead of a box mix?
A: Absolutely! You can use your favorite homemade blue velvet cake recipe in place of the box mix. Just be sure to adjust the baking time and quantity as needed to yield the same amount of cake.
Q: How long do the Glacier Blue Velvet Cake Pops take to make?
A: This recipe has a total time of 45 minutes, with 15 minutes of prep time and 30 minutes of cook time. The chilling and dipping steps add an extra 30-40 minutes, for a total time of about 1 hour and 15 minutes.
Q: Can I make the cake pops ahead of time?
A: Yes, these cake pops are perfect for making ahead. You can store them in an airtight container in the refrigerator for up to 1 week or in the freezer for up to 3 months.
Q: How many Glacier Blue Velvet Cake Pops does this recipe make?
A: This recipe yields 24 cake pops, which is perfect for sharing at parties or gatherings.
Q: What do I do if the candy coating cracks or doesn’t set properly?
A: If the candy coating cracks or doesn’t set smoothly, try reheating it gently in the microwave and stirring in a teaspoon of vegetable oil to thin it out. You can also try chilling the cake pops for longer before dipping to ensure the coating adheres properly.

Glacier Blue Velvet Cake Pops
- Total Time: 45
- Yield: 24 cake pops
Description
Indulge in the velvety texture and vibrant blue hue of these quick and easy Glacier Blue Velvet Cake Pops – the perfect bite-sized dessert for any occasion!
Ingredients
– 1 box (15.25 oz) blue velvet cake mix
– 1/2 cup water
– 1/2 cup vegetable oil
– 3 large eggs
– 8 oz cream cheese, softened
– 1 1/2 cups powdered sugar
– 2 cups white candy melts
– Blue food coloring (gel or liquid)
Instructions
1. Preheat oven to 350°F. Grease and flour a 9×13-inch baking pan.
2. In a large bowl, combine the cake mix, water, oil, and eggs. Beat on medium speed for 2 minutes until well blended.
3. Pour the batter into the prepared pan and bake for 30-35 minutes, until a toothpick inserted in the center comes out clean. Allow the cake to cool completely.
4. In a food processor, crumble the cooled cake into fine crumbs. Add the cream cheese and powdered sugar, then pulse until the mixture forms a smooth, dough-like consistency.
5. Scoop the cake mixture by the tablespoonful and roll into 1-inch balls. Place the cake balls on a parchment-lined baking sheet and refrigerate for 30 minutes.
6. In a microwave-safe bowl, melt the white candy melts according to the package instructions. Stir in a few drops of blue food coloring until you achieve the desired shade of blue.
7. Dip each cake ball into the blue candy coating, allowing any excess to drip off. Place the coated cake pops back on the baking sheet and refrigerate until the coating is set, about 15 minutes.
Notes
For a fun variation, you can add sprinkles or crushed graham crackers to the outside of the cake pops before the candy coating sets. These Glacier Blue Velvet Cake Pops can be stored in an airtight container in the refrigerator for up to 1 week.
- Prep Time: 15
- Cook Time: 30
- Category: Cakes, Pies & Cheesecakes
- Method: Baking
- Cuisine: American
Conclusion
Glacier Blue Velvet Cake Pops are a truly magical treat that will delight your senses and impress your guests. With their vibrant blue hue, velvety texture, and rich, creamy flavor, these cake pops are sure to become a new family favorite. Whether you’re hosting a birthday party, a baby shower, or just looking for a special dessert to enjoy at home, this recipe is sure to exceed your expectations. So gather your ingredients, put on your chef’s hat, and get ready to create a batch of these irresistible Glacier Blue Velvet Cake Pops. Don’t forget to share your creations and let me know how they turned out!


