
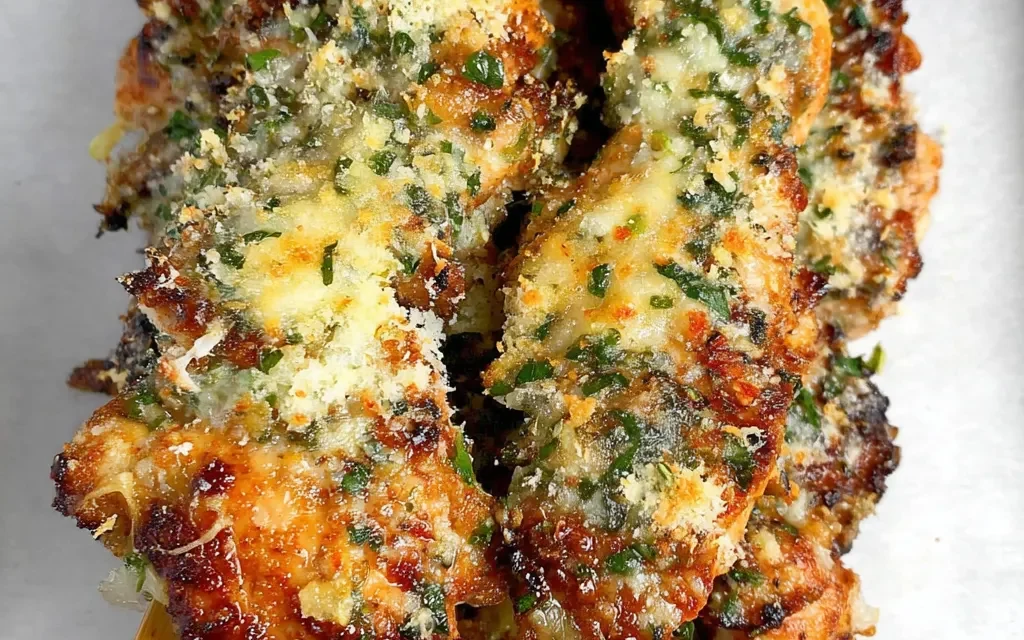
It was a warm summer evening, and my friends were coming over for a backyard BBQ. I wanted to serve something that would really wow them, so I decided to make my famous Garlic Parmesan Chicken Skewers. As I started prepping the ingredients, the mouthwatering aroma of garlic and parmesan filled the kitchen, and I just knew this dish was going to be a hit.
I carefully threaded the juicy chicken cubes onto the skewers, making sure each one was coated in the perfect blend of crunchy breadcrumbs and tangy parmesan. As they sizzled away on the grill, the guests started to gather, drawn in by the incredible scent. When I finally pulled those golden-brown skewers off the heat and served them up, the looks on their faces said it all – this was going to be the star of the show.
Why This Garlic Parmesan Chicken Skewers Recipe Will Become Your Go-To
The Secret Behind Perfect Garlic Parmesan Chicken Skewers
What sets this Garlic Parmesan Chicken Skewers recipe apart is the perfect balance of flavors and textures. The key is in the simple yet genius combination of ingredients – tender chicken, nutty parmesan, and crispy panko breadcrumbs. The addition of fragrant garlic and earthy oregano takes it to the next level, creating a dish that’s both indulgent and incredibly craveable.
The real secret, though, is in the technique. By carefully cubing the chicken and threading it onto skewers, you get maximum surface area for the coating to adhere to. This ensures every bite is bursting with that irresistible parmesan-garlic crunch. And the quick 20-minute cook time means you can have this flavor-packed dish on the table in no time, making it the ultimate go-to for busy weeknights or summer gatherings.
Essential Ingredients You’ll Need
- 1 pound boneless, skinless chicken breasts, cut into 1-inch cubes: The star of the show, these juicy chicken bites are the perfect canvas for the bold garlic-parmesan flavors.
- 1 cup grated parmesan cheese: This salty, nutty cheese provides the perfect savory counterpoint to the crisp panko breadcrumbs.
- 1 cup panko breadcrumbs: Panko’s light and airy texture creates an unbeatable crunch that complements the tender chicken.
- 3 cloves garlic, minced: The aromatic garlic is the backbone of this dish, infusing every bite with its warm, pungent flavor.
- 1 teaspoon dried oregano: This earthy, slightly sweet herb ties all the flavors together, adding depth and complexity.
- 1/2 teaspoon salt, 1/4 teaspoon black pepper: The perfect seasoning duo to enhance the natural flavors of the ingredients.
- 2 tablespoons olive oil: This helps the breadcrumb-parmesan mixture adhere to the chicken and gives it that gorgeous golden-brown crust.
Step-by-Step Garlic Parmesan Chicken Skewers Instructions
Preparing Your Garlic Parmesan Chicken Skewers
With a total prep and cook time of just 35 minutes, these Garlic Parmesan Chicken Skewers come together in a flash. All you’ll need are some wooden or metal skewers, a large mixing bowl, and a baking sheet or grill.
1- Start by preheating your oven or grill to 400°F. While that’s heating up, grab your chicken breasts and cut them into 1-inch cubes, ensuring each piece is evenly sized for even cooking.
2- In a large mixing bowl, combine the parmesan cheese, panko breadcrumbs, minced garlic, dried oregano, salt, and pepper. Toss everything together until well mixed.
3- Drizzle the olive oil over the breadcrumb mixture and use your hands to work it in, creating a coarse, crumbly texture.
4- Thread the chicken cubes onto your skewers, making sure to leave a little space between each piece. Then, roll the skewered chicken in the parmesan-breadcrumb mixture, pressing gently to help it adhere.
5- Arrange the coated skewers on a baking sheet or grill grate, making sure they’re not touching each other.
6- Pop the skewers in the oven or on the grill and let them cook for 20 minutes, flipping halfway through, until the chicken is cooked through and the coating is crispy and golden-brown.
Pro Tips for Success
- Use fresh, high-quality parmesan cheese for maximum flavor. The pre-grated stuff just won’t have the same punch.
- Cutting the chicken into even, bite-sized cubes ensures they cook through evenly and get perfectly crispy on the outside.
- Don’t be afraid to get your hands dirty when coating the skewers. Using your fingers to really press the breadcrumb mixture onto the chicken is key for that satisfying crunch.
- Keep a close eye on the skewers towards the end of the cook time to prevent burning. The parmesan can brown quickly, so be ready to pull them out as soon as they’re golden-brown.
Serving and Storing Your Garlic Parmesan Chicken Skewers
Perfect Pairings for Garlic Parmesan Chicken Skewers
These Garlic Parmesan Chicken Skewers are the ultimate crowd-pleaser, serving up 6 delicious portions. They pair beautifully with a fresh, summery salad or some grilled veggies for a complete and satisfying meal. A crisp white wine or an ice-cold beer would also be the perfect accompaniment, complementing the rich, savory flavors.
Storage and Make-Ahead Tips
For maximum freshness, enjoy your Garlic Parmesan Chicken Skewers right away. However, if you happen to have leftovers, they’ll keep in the fridge for up to 3 days. Simply reheat them in the oven at 350°F for 5-7 minutes, or until heated through and crispy again.
You can also make these skewers ahead of time and freeze them. To do this, prepare the skewers as directed, but don’t cook them. Instead, place them on a baking sheet and pop them in the freezer until solid. Then, transfer the frozen skewers to an airtight container or resealable bag and store for up to 3 months. When ready to enjoy, simply bake the frozen skewers at 400°F for 25-30 minutes, flipping halfway through.
Variations and Dietary Adaptations for Garlic Parmesan Chicken Skewers
Creative Garlic Parmesan Chicken Skewers Variations
While the classic Garlic Parmesan version is hard to beat, there are plenty of ways to switch things up:
- For a Southwestern twist, try swapping the oregano for chili powder and cumin, and serving the skewers with a cool avocado crema.
- In the fall, use pumpkin seeds instead of panko for a seasonal, nutty crunch.
- Add some heat by mixing in a pinch of crushed red pepper flakes or a drizzle of sriracha.
- Experiment with different cheese blends, like a mix of parmesan and pecorino romano, or even a sprinkle of crumbled feta.
Making Garlic Parmesan Chicken Skewers Diet-Friendly
To make these Garlic Parmesan Chicken Skewers more diet-friendly, you can try a few simple swaps:
- For a gluten-free version, use gluten-free panko breadcrumbs or crushed almonds instead of regular breadcrumbs.
- To make them lower in carbs, skip the breadcrumbs altogether and just coat the chicken in the parmesan and spices.
- For a dairy-free option, use nutritional yeast in place of the parmesan cheese.
No matter which variation you choose, the key is to stick to the same easy preparation method for juicy, flavor-packed chicken skewers every time.
Frequently Asked Questions
Q: Can I use chicken thighs instead of breasts?
A: Absolutely! Chicken thighs would work great in this recipe. Just be sure to adjust the cooking time, as thighs may take a few minutes longer to cook through.
Q: How can I make these skewers in advance?
A: You can prepare the skewers up to a day in advance, coating the chicken in the parmesan-breadcrumb mixture, then refrigerating them until ready to bake or grill. Just be sure to let them come up to room temperature before cooking.
Q: Can I bake these skewers instead of grilling them?
A: Yes, you can definitely bake these Garlic Parmesan Chicken Skewers. Preheat your oven to 400°F and bake for 20 minutes, flipping halfway through, until the chicken is cooked through and the coating is crispy.
Q: How many skewers will this recipe make?
A: This recipe will make approximately 6 full-size skewers, serving 6 people. If you’re feeding a smaller crowd, you can easily halve the recipe.
Q: Help! My breadcrumb coating isn’t sticking. What did I do wrong?
A: Make sure you’re really pressing the breadcrumb mixture onto the chicken cubes to help it adhere. You can also try lightly misting the skewered chicken with cooking spray before coating to help the breadcrumbs stick better.

Garlic Parmesan Chicken Skewers
- Total Time: 35
- Yield: 6 servings
Description
These Garlic Parmesan Chicken Skewers are a mouthwatering appetizer that’s quick and easy to make. Tender chicken bites are coated in a savory garlic-parmesan breading and baked to crispy perfection.
Ingredients
– 1 pound boneless, skinless chicken breasts, cut into 1-inch cubes
– 1 cup grated parmesan cheese
– 1 cup panko breadcrumbs
– 3 cloves garlic, minced
– 1 teaspoon dried oregano
– 1/2 teaspoon salt
– 1/4 teaspoon black pepper
– 2 tablespoons olive oil
Instructions
1. Preheat oven to 400°F (200°C). Line a baking sheet with parchment paper.
2. In a shallow bowl, combine the parmesan cheese, panko breadcrumbs, garlic, oregano, salt, and pepper. Mix well.
3. Thread the chicken cubes onto skewers, leaving a small space between each piece.
4. Brush the chicken skewers lightly with olive oil, then roll them in the parmesan-breadcrumb mixture, pressing gently to help the coating adhere.
5. Arrange the coated chicken skewers on the prepared baking sheet.
6. Bake for 15-20 minutes, flipping the skewers halfway, until the chicken is cooked through and the breading is golden brown.
7. Serve the Garlic Parmesan Chicken Skewers warm, with your favorite dipping sauce on the side.
Notes
For extra flavor, you can add a sprinkle of lemon zest to the breadcrumb mixture. These skewers also make a great party appetizer or snack.
- Prep Time: 15
- Cook Time: 20
- Category: Appetizers
- Method: Baking
- Cuisine: American
Conclusion
These Garlic Parmesan Chicken Skewers are the ultimate summertime crowd-pleaser, with their irresistible combination of juicy chicken, crunchy coating, and bold garlic-parmesan flavor. Whether you’re hosting a backyard BBQ or looking for a quick and easy weeknight dinner, this recipe is sure to become a new family favorite. So fire up the grill, grab those skewers, and get ready to wow your guests with these flavor-packed bites. Don’t forget to let me know how they turn out – I can’t wait to hear what you think!


