
I’ll never forget the time my sister and I decided to whip up a batch of Frozen Yogurt Bark with Fresh Fruit on a hot summer day. We were both craving something cool, creamy, and bursting with juicy flavor – and this recipe hit the spot perfectly. As we stood in the kitchen, carefully arranging the fresh berries and sliced kiwi over the frozen yogurt base, the anticipation was palpable. The vibrant colors of the fruit danced against the stark white of the yogurt, and we couldn’t wait to dive in.
When the 4-hour chill time was finally up, we eagerly pulled the pan from the freezer and admired our handiwork. The Frozen Yogurt Bark had set up beautifully, with a delightfully creamy and frosty texture. As we took our first bites, the sweet-tart flavors mingled together in perfect harmony, cooling us down on that sweltering afternoon. It was the ultimate guilt-free treat – nutritious, satisfying, and totally refreshing. From that day on, Frozen Yogurt Bark with Fresh Fruit became our go-to recipe for hot weather cravings and last-minute dessert ideas. It’s just so easy to make, and the results are simply spectacular.
Why This Frozen Yogurt Bark with Fresh Fruit Recipe Will Become Your Go-To
The Secret Behind Perfect Frozen Yogurt Bark with Fresh Fruit
The secret to this Frozen Yogurt Bark with Fresh Fruit recipe is in the simple yet ingenious technique. By blending creamy Greek yogurt with sweet honey, you create a luxurious base that freezes up beautifully. The honey not only adds a delightful touch of sweetness, but it also helps prevent the yogurt from becoming icy or rock-hard in the freezer.
When you layer in your choice of fresh, juicy fruit, the end result is a dessert that’s both visually stunning and downright delicious. As the yogurt bark freezes, the fruit gets perfectly chilled and infused with the tangy-sweet flavor of the yogurt. Each bite delivers a burst of refreshing, fruity flavor balanced by the creamy, indulgent yogurt. It’s the ultimate healthy treat that will have your taste buds doing a happy dance.
Essential Ingredients You’ll Need
The beauty of this Frozen Yogurt Bark with Fresh Fruit recipe lies in its simplicity. You only need a handful of high-quality ingredients to create this showstopping dessert:
- 32 oz plain Greek yogurt – The thick, creamy texture of Greek yogurt is essential for achieving the perfect frozen yogurt base. Its higher protein content also helps prevent iciness.
- 1/2 cup honey – Honey not only sweetens the yogurt, but it also acts as a stabilizer, keeping the yogurt soft and scoopable even when frozen.
- 2 cups mixed fresh fruit – Vibrant, juicy fruits like strawberries, blueberries, and kiwi add pops of color and refreshing flavor to the frozen yogurt bark.
These simple yet premium ingredients come together to create a Frozen Yogurt Bark that’s both nutritious and delectable. It’s the perfect guilt-free indulgence for hot summer days or anytime you need a cool, creamy treat.
Step-by-Step Frozen Yogurt Bark with Fresh Fruit Instructions
Preparing Your Frozen Yogurt Bark with Fresh Fruit
This Frozen Yogurt Bark with Fresh Fruit recipe is incredibly easy to make, with just 15 minutes of prep time and zero minutes of cook time. All you need is a mixing bowl, a baking sheet, and some basic kitchen tools.
1- Start by lining a large baking sheet with parchment paper or a silicone baking mat. This will ensure the frozen yogurt bark doesn’t stick to the pan.
2- In a large mixing bowl, combine the 32 oz of plain Greek yogurt and 1/2 cup of honey. Use a whisk or an electric mixer to blend the two ingredients together until the honey is fully incorporated and the mixture is smooth and creamy.
3- Spread the sweetened yogurt mixture evenly over the prepared baking sheet, using a spatula to create a flat, even layer.
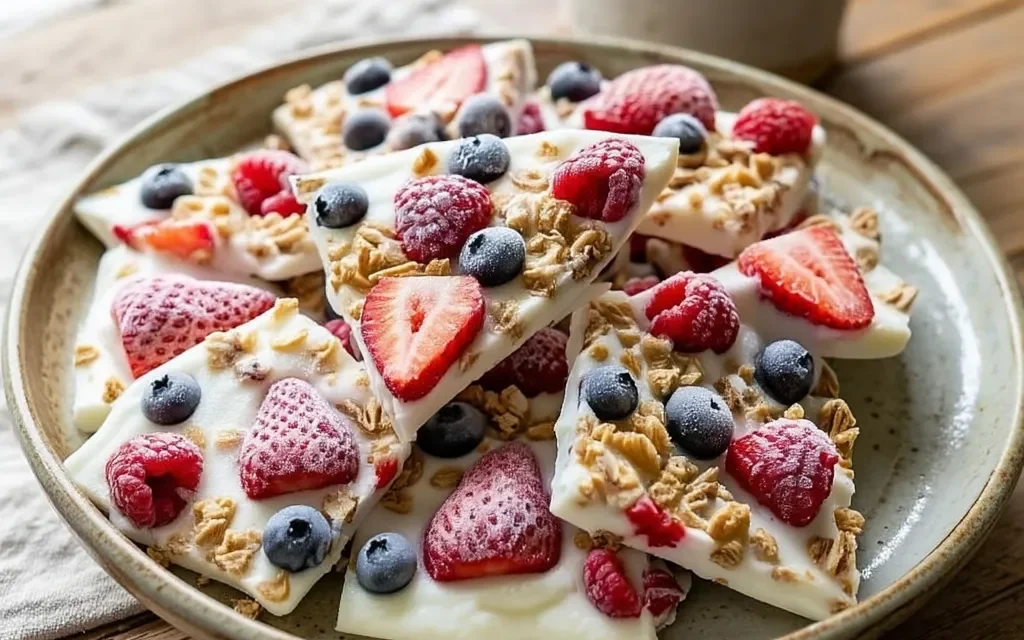
4- Carefully arrange the 2 cups of mixed fresh fruit (such as sliced strawberries, blueberries, and kiwi) in a visually appealing pattern over the top of the yogurt. Gently press the fruit into the yogurt to help it adhere.
5- Place the baking sheet in the freezer and allow the Frozen Yogurt Bark to freeze for 4 hours, or until completely solid.
6- Once the Frozen Yogurt Bark is frozen, use a sharp knife or pizza cutter to slice it into bars or squares. Serve the chilled, fruity treats immediately, or store them in an airtight container in the freezer for up to 2 weeks.
Pro Tips for Success
To ensure your Frozen Yogurt Bark with Fresh Fruit turns out perfectly every time, keep these expert tips in mind:
- Use high-quality, full-fat Greek yogurt for the creamiest texture. Low-fat or non-fat yogurt can result in an icy, grainy consistency.
- Incorporate the honey thoroughly to prevent any pockets of sweetness. The honey helps keep the yogurt soft and scoopable when frozen.
- Slice the fruit into uniform pieces for the most visually appealing presentation. Smaller, bite-sized pieces will also be easier to eat.
- Freeze the yogurt bark on a completely flat surface to ensure an even thickness and a smooth top.
- Allow the yogurt bark to freeze for the full 4 hours – any less and it may not set up properly.
- Store the frozen yogurt bark in an airtight container to prevent freezer burn and maintain its creamy texture.
Serving and Storing Your Frozen Yogurt Bark with Fresh Fruit
Perfect Pairings for Frozen Yogurt Bark with Fresh Fruit
This Frozen Yogurt Bark with Fresh Fruit recipe is the ultimate refreshing and healthy treat, making it the perfect dessert for a variety of occasions. Serve it up on a hot summer day alongside a glass of lemonade or iced tea for a truly rejuvenating snack. It also makes a lovely addition to a brunch or afternoon tea spread, complementing savory items like quiche or scones.
For a more indulgent pairing, try drizzling the Frozen Yogurt Bark with a bit of melted dark chocolate or sprinkling it with toasted nuts or granola. And don’t forget that this recipe yields 8 servings, so it’s perfect for sharing with family and friends.
Storage and Make-Ahead Tips
One of the best things about this Frozen Yogurt Bark with Fresh Fruit recipe is that it can be made well in advance and stored in the freezer until you’re ready to serve it.
To store, simply cut the frozen bark into individual portions and place them in an airtight container or freezer-safe bag. It will keep in the freezer for up to 2 weeks. When you’re ready to enjoy, just take out as many servings as you need and let them sit at room temperature for 5-10 minutes before serving.
For make-ahead convenience, you can even prepare the entire batch of yogurt and fruit up to 1 day in advance. Simply spread the yogurt mixture onto the baking sheet, top with the fresh fruit, and freeze until solid. Then, cut and transfer the individual portions to a storage container, and you’ll have a ready-to-go frozen treat anytime the craving strikes.
Variations and Dietary Adaptations for Frozen Yogurt Bark with Fresh Fruit
Creative Frozen Yogurt Bark with Fresh Fruit Variations
The beauty of this Frozen Yogurt Bark with Fresh Fruit recipe is that it’s endlessly customizable. Try swapping in different types of fresh fruit, such as mango, pineapple, or melon, for a tropical twist. You can also experiment with a mix of berries, like raspberries, blackberries, and cherries, for a vibrant red and purple color scheme.
For a festive touch, top the yogurt bark with diced kiwi, mandarin oranges, and pomegranate arils for a patriotic red, white, and blue dessert. Or, for a touch of warmth, add a sprinkle of cinnamon or a drizzle of melted dark chocolate over the top.
Making Frozen Yogurt Bark with Fresh Fruit Diet-Friendly
This Frozen Yogurt Bark with Fresh Fruit recipe is already a relatively healthy treat, but you can easily adapt it to accommodate various dietary needs and restrictions.
For a gluten-free version, simply ensure that the honey you’re using is certified gluten-free. You can also opt for a gluten-free granola or chopped nuts as a crunchy topping.
To make it vegan, swap out the Greek yogurt for a plant-based yogurt alternative, such as coconut, almond, or soy yogurt. Use maple syrup or agave nectar in place of the honey to maintain the sweetness.
For a low-carb or keto-friendly take, use a sugar-free sweetener like erythritol or stevia instead of honey. And instead of the fruit, top the yogurt bark with chopped nuts, unsweetened coconut flakes, or a sprinkle of cinnamon.
No matter how you customize it, this Frozen Yogurt Bark with Fresh Fruit recipe is sure to satisfy your sweet tooth while keeping your nutritional goals on track.
Frequently Asked Questions
Q: Can I use a different type of yogurt besides Greek yogurt?
A: While you can technically use a regular plain yogurt in this recipe, we highly recommend sticking with Greek yogurt. Its thicker, creamier texture is essential for achieving the perfect frozen yogurt bark consistency.
Q: How long does it take for the Frozen Yogurt Bark to freeze completely?
A: The total time for the Frozen Yogurt Bark to freeze is 4 hours. It’s important to allow the full 4 hours for the yogurt to set up properly and develop that delightfully creamy, frosty texture.
Q: Can I make this Frozen Yogurt Bark recipe ahead of time?
A: Absolutely! This recipe is perfect for making in advance. You can prepare the entire batch, cut it into portions, and store it in the freezer for up to 2 weeks. When you’re ready to serve, just take out as many pieces as you need and let them thaw for 5-10 minutes.
Q: How many servings does this Frozen Yogurt Bark recipe make?
A: This Frozen Yogurt Bark with Fresh Fruit recipe yields 8 servings. The recipe is easily scalable, so you can double or triple the ingredients to make a larger batch for a crowd.
Q: What if my Frozen Yogurt Bark turns out icy or grainy?
A: If your Frozen Yogurt Bark ends up with an icy or grainy texture, it’s likely due to using a low-fat or non-fat yogurt. Make sure to use a high-quality, full-fat Greek yogurt next time, and be sure to thoroughly incorporate the honey, which helps keep the yogurt soft and creamy when frozen.

Frozen Yogurt Bark with Fresh Fruit
- Total Time: 240
- Yield: 8 servings
- Diet: Vegetarian
Description
Enjoy a quick and easy frozen treat with this creamy Frozen Yogurt Bark topped with fresh, juicy fruit. It’s the perfect healthy snack or dessert for hot summer days!
Ingredients
– 32 oz plain Greek yogurt
– 1/2 cup honey
– 2 cups mixed fresh fruit (such as strawberries, blueberries, kiwi)
Instructions
1. Line a baking sheet with parchment paper.
2. In a large bowl, mix together the Greek yogurt and honey until well combined.
3. Spread the yogurt mixture evenly onto the prepared baking sheet.
4. Arrange the fresh fruit in a single layer on top of the yogurt.
5. Place the baking sheet in the freezer and freeze for at least 4 hours, or until completely set.
6. Once frozen, break the yogurt bark into pieces and serve immediately.
Notes
Store any leftover Frozen Yogurt Bark in an airtight container in the freezer for up to 2 weeks.
- Prep Time: 15
- Category: Desserts
- Method: Freezing
- Cuisine: American
Conclusion
This Frozen Yogurt Bark with Fresh Fruit recipe is a total game-changer when it comes to guilt-free, refreshing summer treats. With its creamy, honey-sweetened yogurt base and vibrant bursts of juicy fruit, it’s a dessert that’s both nourishing and indulgent.
What I love most about this recipe is how versatile and easy it is to make. You can customize the fruit toppings to your heart’s content, and the make-ahead convenience means you can have a stash of these frozen yogurt bars on hand whenever a craving strikes.
So the next time you’re looking for a cool, creamy, and healthy way to satisfy your sweet tooth, give this Frozen Yogurt Bark with Fresh Fruit a try. I guarantee it’ll become a new summertime staple in your household. Don’t forget to share your creations with me – I’d love to see how you make this recipe your own!


