
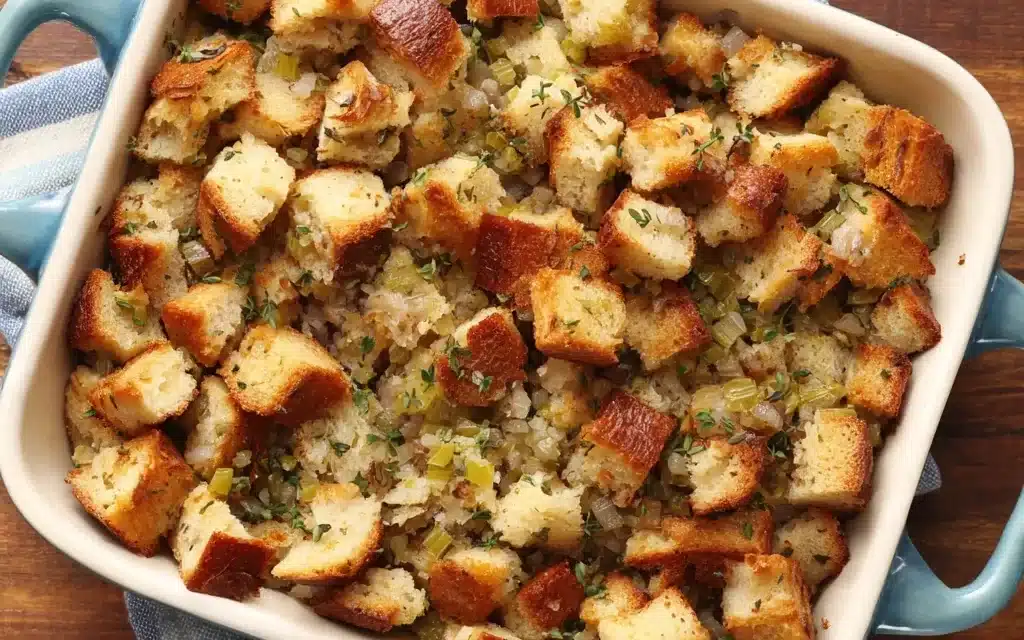
Growing up, Classic Herb Stuffing was the undisputed star of our family’s Thanksgiving feast. The aroma of fragrant herbs, toasted bread, and simmering turkey juices would fill the entire house, pulling us all together in the kitchen. I can still picture my grandmother, a master of this timeless recipe, skillfully blending the ingredients with her weathered hands, her eyes sparkling with pride.
What Makes This Classic Herb Stuffing Recipe Special
Let me tell you why this Classic Herb Stuffing recipe stands out from the crowd. After testing countless variations, I’ve discovered the perfect combination that delivers:
- Incredible flavor that’ll have your family asking for seconds
- Simple techniques that work every single time
- Flexible ingredients you can easily find at any grocery store
- Professional results without professional equipment
The Science Behind Perfect Classic Herb Stuffing
Understanding what happens during cooking makes all the difference. Here’s what sets this recipe apart:
| Technique | Why It Works | Result |
|---|---|---|
| Toasting the bread cubes | Toasting creates a crisp exterior that absorbs flavors without becoming soggy | Perfectly textured stuffing with a satisfying crunch |
| Sautéing the aromatics | Cooking the onions, celery, and herbs in butter releases their essential oils and deepens the flavors | A rich, aromatic base that elevates the entire dish |
| Slow baking in a covered dish | Gentle, even heat ensures the stuffing cooks through without drying out | Moist, fluffy stuffing with a golden-brown crust |
Essential Ingredients Breakdown
Core Ingredients
Here’s everything you’ll need to create the perfect Classic Herb Stuffing:
Primary Ingredients:
- Bread – Use a high-quality, day-old bread for the perfect texture. Avoid anything too soft or crumbly.
- Onions – Yellow onions provide the perfect balance of sweetness and pungency.
- Celery – Crisp, fresh celery stalks add essential flavor and crunch.
Flavor Enhancers:
- Sage – The earthy, slightly peppery notes of fresh sage are a classic match for this dish.
- Thyme – Aromatic thyme complements the other herbs and adds depth.
- Chicken or Vegetable Broth – The broth keeps the stuffing moist and infuses it with savory goodness.
Step-by-Step Classic Herb Stuffing Instructions
Equipment You’ll Need
Before we start cooking, gather these essential tools:
- Large mixing bowl
- Cutting board and sharp knife
- Sauté pan or skillet
- Measuring cups and spoons
- Baking dish or casserole
Preparation Timeline
Total Time: 75 minutes
- Prep Time: 20 minutes
- Cook Time: 40 minutes
- Rest/Cool Time: 15 minutes
Detailed Cooking Steps
Step 1: Preparation Phase
Start by cutting the bread into 1-inch cubes and spreading them out on a baking sheet. Toast the bread in a 350°F oven for 10-15 minutes, stirring occasionally, until lightly golden brown. Transfer the toasted bread cubes to a large mixing bowl.
Step 2: Initial Cooking
In a sauté pan, melt the butter over medium heat. Add the diced onions and celery, and cook for 8-10 minutes, stirring frequently, until the vegetables are softened and translucent.
Step 3: Flavor Development
Add the minced garlic, chopped sage, and thyme to the pan. Cook for an additional 2-3 minutes, until the herbs are fragrant. Pour the vegetable mixture over the toasted bread cubes and gently toss to combine.
Step 4: Final Cooking Stage
Gradually add the chicken broth to the bread mixture, stirring gently, until the bread is evenly moistened but not soggy. Transfer the stuffing to a buttered baking dish or casserole. Cover the dish with foil and bake at 375°F for 30 minutes.
Step 5: Finishing Touches
Remove the foil and continue baking for an additional 10 minutes, or until the top is golden brown and crispy. Allow the Classic Herb Stuffing to rest for 15 minutes before serving.
Pro Chef Tips for Success
🔥 Temperature Control Tips:
- Use an oven thermometer to ensure your oven is accurately at 375°F.
- Check the internal temperature of the stuffing – it should reach 165°F when fully cooked.
- Adjust the baking time as needed if the top is browning too quickly.
⚡ Technique Secrets:
- Toasting the bread cubes ahead of time ensures they won’t become soggy when the broth is added.
- Sautéing the aromatics in butter adds a rich, caramelized flavor.
- Avoid overmixing the stuffing, which can lead to a dense, heavy texture.
✨ Flavor Boosting Hacks:
- Add a splash of dry white wine or sherry to the vegetable mixture for extra depth.
- Stir in a handful of chopped fresh parsley or rosemary just before baking.
- Top the stuffing with grated Parmesan cheese for a crispy, savory crust.
Serving Suggestions & Pairings
Perfect Combinations
This Classic Herb Stuffing pairs beautifully with:
| Main Pairing | Why It Works | Serving Style |
|---|---|---|
| Roast Turkey | The flavors of the stuffing complement the turkey perfectly | Serve the stuffing alongside sliced turkey on a platter |
| Cranberry Sauce | The tart, sweet cranberries balance the richness of the stuffing | Offer a side of homemade cranberry sauce for guests to top their servings |
| Mashed Potatoes | The creamy, comforting mashed potatoes are an ideal accompaniment | Scoop the stuffing onto plates and nestle the mashed potatoes alongside |
Occasion Ideas
Perfect for:
- Thanksgiving – This Classic Herb Stuffing is the quintessential holiday side dish.
- Christmas Dinner – Its festive flavors make it a wonderful addition to a Christmas feast.
- Sunday Supper – Enjoy this satisfying stuffing as part of a cozy, family-style meal.
Storage & Make-Ahead Guide
Short-Term Storage (1-3 days)
Refrigerator Storage:
- Store the cooked Classic Herb Stuffing in an airtight container in the refrigerator.
- Keep it at a temperature between 40°F and 140°F.
- If storing separately from the turkey, allow the stuffing to cool completely before refrigerating.
Reheating Instructions:
- To reheat, transfer the stuffing to an oven-safe dish and cover with foil.
- Bake at 350°F for 15-20 minutes, or until heated through.
- You can also reheat individual portions in the microwave, stirring occasionally, until hot.
Recipe Variations & Adaptations
Flavor Variations
Classic Variations:
- Sausage Stuffing: Add crumbled cooked sausage to the bread mixture for a heartier, more savory flavor.
- Mushroom Stuffing: Sauté sliced mushrooms with the onions and celery for an earthy twist.
- Apple Pecan Stuffing: Fold in diced apples and toasted pecans for a sweet and nutty note.
Dietary Adaptations
| Dietary Need | Substitutions | Notes |
|---|---|---|
| Gluten-Free | Use gluten-free bread cubes or crushed gluten-free crackers | The texture may be slightly different, but the flavors will still be delicious |
| Dairy-Free | Replace the butter with olive oil or a dairy-free butter alternative | The richness of the dish will be slightly reduced |
| Low-Carb | Swap the bread for cauliflower florets or cubed eggplant | Adjust the cooking time as the vegetables will have a different texture |
| Vegan | Use vegetable broth and omit the butter, replacing it with olive oil | Ensure to use vegan-friendly bread and consider adding extra herbs and spices for flavor |
Troubleshooting Common Issues
Problem-Solution Guide
| Common Issue | Likely Cause | Quick Fix | Prevention |
|---|---|---|---|
| Dry, crumbly stuffing | Overcooking or not adding enough broth | Stir in a few tablespoons of additional broth and cover the dish to steam the stuffing | Measure the broth carefully and don’t overbake the stuffing |
| Soggy, dense texture | Using too much broth or not toasting the bread cubes | Spread the stuffing on a baking sheet and bake at 350°F for 10-15 minutes to dry it out | Toast the bread cubes thoroughly before assembling the stuffing |
| Bland flavor | Insufficient seasoning or lack of aromatics | Stir in additional sage, thyme, salt, and pepper to taste | Sauté the onions, celery, and herbs thoroughly to develop maximum flavor |
Frequently Asked Questions
Q: Can I make this Classic Herb Stuffing ahead of time?
A: Absolutely! This stuffing is perfect for making in advance. Prepare the stuffing through Step 4, then cover and refrigerate it for up to 3 days. When ready to serve, bake the stuffing according to the instructions in Step 5.
Q: What’s the best substitute for fresh sage?
A: If you can’t find fresh sage, you can use 1 teaspoon of dried sage per 2 tablespoons of fresh sage called for in the recipe. The flavor won’t be quite as vibrant, but it will still work well.
Q: How do I know when the Classic Herb Stuffing is perfectly done?
A: The stuffing is ready when the top is golden brown and crispy, and an instant-read thermometer inserted into the center reads 165°F. The texture should be moist but not soggy, with a light, fluffy consistency.
Q: Can I double or halve this recipe?
A: Absolutely! This recipe scales up or down very well. If doubling, use a larger baking dish and increase the baking time by 5-10 minutes. For halving, use a smaller dish and reduce the baking time accordingly.
Q: Why didn’t my Classic Herb Stuffing turn out like yours?
A: A few common issues could be: not toasting the bread cubes enough, overcooking the vegetables, or using too much or too little broth. Refer to the troubleshooting guide for specific solutions. And be sure to follow the recipe and tips closely for the best results.

Classic Herb Stuffing
- Total Time: 50
- Yield: 8 servings
Description
Elevate your holiday meal with this irresistible Classic Herb Stuffing. Bursting with flavors from fresh herbs, toasted bread, and aromatic veggies, this easy side dish is a must-have for Thanksgiving and Christmas.
Ingredients
– 1 loaf of day-old bread, cubed
– 1 onion, diced
– 3 celery stalks, diced
– 4 cloves garlic, minced
– 1/2 cup unsalted butter
– 1 cup chicken or vegetable broth
– 2 eggs, beaten
– 1 tbsp fresh parsley, chopped
– 1 tbsp fresh sage, chopped
– 1 tbsp fresh thyme, chopped
– 1 tsp salt
– 1/2 tsp black pepper
Instructions
1. – Preheat the oven to 375°F. Grease a 9×13 baking dish.
2. – In a large skillet, melt the butter over medium heat. Add the onions, celery, and garlic. Cook for 5-7 minutes until softened.
3. – In a large bowl, combine the bread cubes, cooked vegetables, herbs, salt, pepper, and broth. Mix well.
4. – Stir in the beaten eggs until fully incorporated.
5. – Transfer the stuffing mixture to the prepared baking dish. Bake for 30-35 minutes, until golden brown on top.
6. – Serve hot as a side dish. Enjoy!
Notes
– For a firmer stuffing, reduce the broth to 3/4 cup.
– Add chopped nuts, cranberries, or sausage for extra flavor.
– Stuffing can be made a day ahead and refrigerated before baking.
- Prep Time: 15
- Cook Time: 35
- Category: Side Dish
- Method: Baking
- Cuisine: American
Final Thoughts
There you have it – the ultimate guide to making perfect Classic Herb Stuffing! This recipe has been a game-changer in my kitchen, and I know it’ll become a staple in yours too.
What makes this recipe special:
- Foolproof techniques that work every time
- Flexible ingredients that adapt to your preferences
- Professional results with home kitchen equipment
Give this Classic Herb Stuffing recipe a try this week, and don’t forget to share your results! I’d love to see your creations – tag me on social media or leave a comment below with your variations and tips.
Your turn: What’s your favorite way to enjoy Classic Herb Stuffing? Share your family traditions or creative twists in the comments!


