
I’ll never forget the first time I made bloomin’ apples. It was a crisp fall afternoon, and the scent of cinnamon and brown sugar was wafting through the air. I had been wanting to try this recipe for ages, but I’ll admit, I was a little intimidated. Bloomin’ apples just sounded so fancy and complicated. But let me tell you, once I got started, it was a breeze!
I remember gathering all my ingredients, feeling that excited flutter in my stomach. As I sliced into the first juicy apple, I couldn’t help but smile. There’s something so satisfying about transforming a simple fruit into a decadent, visually-stunning dessert. I carefully arranged the apple slices, drizzling them with the sweet glaze and sprinkling on the crunchy toppings. When I pulled that first bloomin’ apple out of the oven, the aroma was absolutely intoxicating.
I’ll never forget the look on my family’s faces as I set that platter down on the table. Their eyes went wide, and they just stared for a moment, mouths agape. “You made these?” my sister asked, her voice full of wonder. I nodded, trying to contain my grin. “Go on, try one!” I urged. And let me tell you, the way their faces lit up after that first bite – pure bliss. From that moment on, bloomin’ apples became a fall staple in our household. It’s a recipe I come back to time and time again, and I’m thrilled to share it with all of you.
Why This bloomin’ apples Recipe Will Become Your Go-To
There’s just something so magical about bloomin’ apples. Sure, they may look impressive, but the truth is, they’re actually quite simple to make. This recipe is the perfect balance of sweet and tart, with a delightful crunch that will have your guests reaching for seconds (and thirds!). But the real secret? It’s all in the technique.
The Secret Behind Perfect bloomin’ apples
The key to achieving those beautifully fanned apple slices is to slice them super thin – no more than 1/4 inch thick. This ensures that they’ll curl up and bloom in the oven, creating that stunning, professional-looking presentation. And the glaze? Oh, it’s a game-changer. A simple mixture of brown sugar, cinnamon, and a touch of vanilla infuses every bite with warm, comforting flavor. Trust me, once you try this recipe, it’ll become a fall staple in your household, just like it is in mine.
Essential Ingredients You’ll Need
– Apples: Go for a firm, tart variety like Granny Smith or Honeycrisp. These hold their shape best when baked.
– Brown sugar: This adds a rich, caramelized sweetness to the glaze.
– Cinnamon: The quintessential fall spice that pairs perfectly with apples.
– Vanilla extract: For a warm, aromatic note.
– Butter: Just a bit to help the glaze come together and create that irresistible sheen.
– Pecans: Toasted pecans provide a delightful crunch.
– Caramel sauce (optional): For an extra indulgent drizzle.
Step-by-Step bloomin’ apples Instructions
Preparing Your bloomin’ apples
Making bloomin’ apples is surprisingly easy, but it does require a bit of time and care. Set aside about an hour from start to finish, and make sure you have a sharp knife and a sturdy baking dish on hand. The result? A showstopping dessert that’s sure to impress.
1- Start by preheating your oven to 375°F. Grease a 9-inch baking dish or cast-iron skillet with butter or non-stick cooking spray.
2- Peel and core the apples, then slice them into very thin, even slices – no more than 1/4 inch thick. Arrange the slices in a circular pattern in the prepared baking dish, fanning them out as you go.
3- In a small saucepan, combine the brown sugar, cinnamon, and vanilla. Cook over medium heat, stirring constantly, until the mixture is fragrant and starting to bubble, about 2-3 minutes.
4- Remove the pan from the heat and stir in the butter until it’s fully melted and incorporated. Drizzle this delectable glaze evenly over the arranged apple slices, making sure to get in between each one.
5- Top the glazed apples with the toasted pecans, pressing them gently into the slices.
6- Bake the bloomin’ apples for 35-40 minutes, until the apples are tender and the glaze is bubbly and caramelized. Allow the dish to cool for 10 minutes before serving. Drizzle with caramel sauce, if desired, and enjoy!
Pro Tips for Success
– Slicing the apples as thin as possible is key for getting that beautiful, fanned-out look. Use a very sharp knife or a mandoline slicer for best results.
– Don’t skimp on the glaze – be generous! The sweet, cinnamony mixture is what really takes these bloomin’ apples to the next level.
– Keep a close eye on the pecans towards the end of baking to prevent them from burning.
– If you notice any gaps between the apple slices, gently press them together to create a more cohesive, blooming effect.
Serving and Storing Your bloomin’ apples
Perfect Pairings for bloomin’ apples
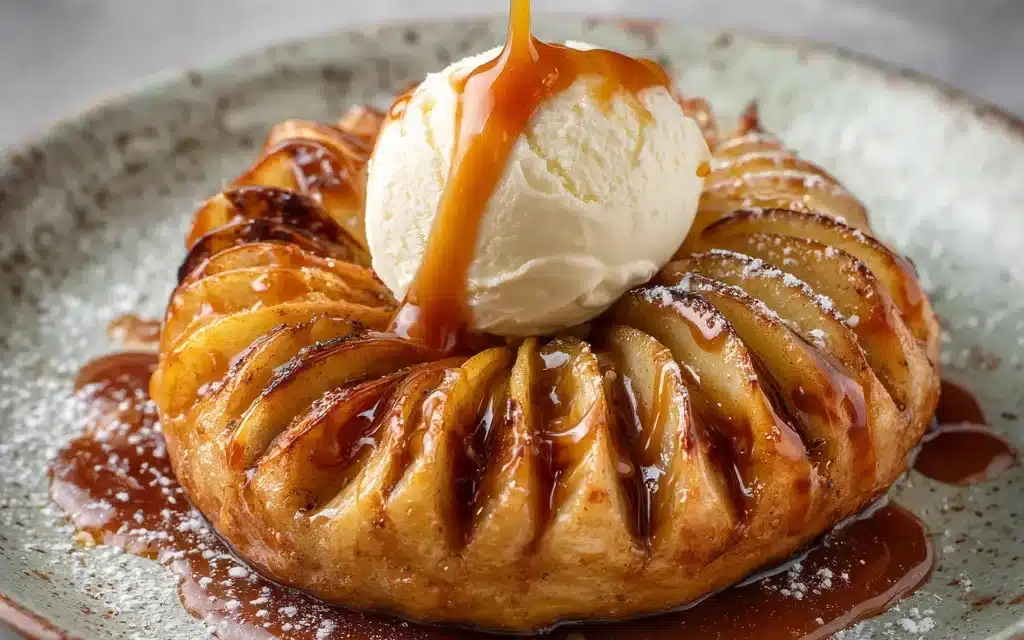
Bloomin’ apples are the perfect fall dessert, but they also make a lovely addition to your Thanksgiving or Christmas spread. Serve them alongside a scoop of vanilla ice cream or a dollop of whipped cream for an extra decadent treat. They also pair beautifully with a hot cup of coffee or a glass of mulled wine.
Storage and Make-Ahead Tips
Leftover bloomin’ apples can be stored in the refrigerator for up to 4 days. Simply cover the baking dish with foil or plastic wrap. To reheat, pop it back in the oven at 350°F for 10-15 minutes, until warmed through.
You can also prepare the dish in advance and bake it just before serving. Simply assemble the apples and glaze in the baking dish, cover, and refrigerate for up to 2 days. When ready to serve, bake as directed.
Variations and Dietary Adaptations for bloomin’ apples
Creative bloomin’ apples Variations
The great thing about bloomin’ apples is that they’re incredibly versatile. Try swapping out the Granny Smith or Honeycrisp apples for a sweeter variety like Gala or Fuji. You can also play around with the spices, using nutmeg, allspice, or a touch of ginger in the glaze. For a festive twist, add a sprinkle of crushed candy canes or chopped crystallized ginger on top.
Making bloomin’ apples Diet-Friendly
Looking to make your bloomin’ apples a little lighter? Try using a sugar substitute like erythritol or monk fruit in the glaze. You can also skip the pecans for a nut-free version, or swap them out for toasted coconut flakes or chopped almonds. For a gluten-free option, simply ensure your caramel sauce is certified GF.
Frequently Asked Questions
Q: Can I use a different type of apple?
A: Absolutely! While Granny Smith and Honeycrisp are classic choices, you can experiment with other firm, tart varieties like Braeburn, Jonagold, or Fuji. Just keep in mind that sweeter apples may require a bit less sugar in the glaze.
Q: How thin should I slice the apples?
A: Aim for slices that are no more than 1/4 inch thick. This will ensure that the apples curl and bloom beautifully in the oven.
Q: Can I make these bloomin’ apples ahead of time?
A: Yes, you can assemble the dish up to 2 days in advance and refrigerate it until you’re ready to bake. Just be sure to let it come to room temperature before popping it in the oven.
Q: How do I know when the bloomin’ apples are done?
A: The apples should be tender when pierced with a fork, and the glaze should be bubbly and caramelized. Keep an eye on the pecans towards the end to make sure they don’t burn.
Q: Can I make these bloomin’ apples in a different baking dish?
A: Absolutely! A 9-inch baking dish or cast-iron skillet works great, but you can also use a 9-inch pie plate or even individual ramekins for a fun, personal presentation.

Bloomin’ Apples
- Total Time: 45
- Yield: 4
Description
Bloomin’ apples are a delightful, easy-to-make treat that’s perfect for a cozy fall dessert. Baked to perfection with a cinnamon-sugar coating, these bloomin’ apples are sure to become a new family favorite.
Ingredients
– 4 large Honeycrisp or Gala apples
– 1/2 cup brown sugar
– 1 teaspoon ground cinnamon
– 1/4 cup butter, melted
– 1/4 cup chopped walnuts (optional)
– Vanilla ice cream, for serving (optional)
Instructions
1. 1. Preheat oven to 375°F. Grease a baking dish or cast-iron skillet.
2. 2. Core the apples, leaving the bottom intact. Use a paring knife to score around the top of each apple, making shallow cuts about 1 inch apart.
3. 3. In a small bowl, mix together the brown sugar and cinnamon.
4. 4. Place the apples in the prepared baking dish. Drizzle the melted butter over the tops and sides of the apples. Sprinkle the cinnamon-sugar mixture evenly over the apples, getting it into the scored cuts.
5. 5. Bake for 30-40 minutes, until the apples are tender and the tops are caramelized.
6. 6. If desired, sprinkle the chopped walnuts over the tops of the apples during the last 10 minutes of baking.
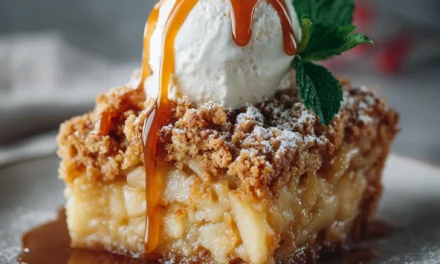
7. 7. Serve the bloomin’ apples warm, with a scoop of vanilla ice cream if desired.
Notes
For a crisper topping, broil the apples for 2-3 minutes after baking. Adjust baking time as needed depending on the size of your apples. You can also use a melon baller to scoop out the core, leaving a small well in the center of each apple.
- Prep Time: 10
- Cook Time: 35
- Category: Dessert
- Method: Baking
- Cuisine: American
Conclusion
Bloomin’ apples are truly a fall showstopper, and this recipe is sure to become a cherished classic in your household. With its perfect balance of sweet, tart, and crunchy flavors, it’s a dessert that’s sure to impress family and friends alike. So what are you waiting for? Gather your ingredients, preheat that oven, and get ready to create a bloomin’ masterpiece! And don’t forget to share your creations with me – I’d love to see how your bloomin’ apples turn out.


